

Mike Aiton and Mike Thornton recently visited Graham and Adam Daniel at Point1Post in Elstree, north of London at their invitation following Mike Thornton’s recent series on working in Auro 3D.
Who Are Point1Post?
Point1Post is a father and son team - Graham and Adam Daniel and they provide post production sound services to the film industry specialising in feature films, documentaries and commercials. Their state of the art Dolby Atmos mixing stage is just 5 minutes from Elstree Film Studios with Central London only 22 minutes by train or 40 minutes by car.
They also offer complete sound packages and availability as freelance re-recording mixers having mixed films in London, Berlin, Prague Istanbul and Rome. Their ethos is to be client focused without all the corporate flab.
An Introduction To Dolby Atmos
Adam reached out to us following our series of videos on working in Auro 3D and asked if we would like to do something similar with Dolby Atmos. This article is an introduction to Dolby Atmos and Pro Tools and we are planning videos to follow in due course.
What Is Dolby Atmos
Dolby Atmos is an immersive experience that utilises up to 64 channels. The speakers completely envelop the audience from behind the screen, on the walls and overhead. Dolby Atmos is designed to enhance the conventional 7.1 format by adding an additional stereo overhead array and up to 118 “sound objects”. These objects can be moved through the theatre in all 3 dimensions. Dolby Atmos Cinema processors take into account the exact specification and dimensions of any playback auditorium so that the effect is the same in each theatre. Watch this video as Dolby explain it much better than we could in words.
In summary, what Dolby Atmos does, is to enhance the conventional, side surround and rear surround 7.1 film speaker layout, the speakers in red in the diagram below, with an array of additional speakers overhead and in line with the side surround speakers on the side walls closer to the screen, shown as the speakers in blue in the diagram below. The surround speakers now become full frequency range. The addition of subwoofers in the walls or ceiling, shown in purple below, provide bass management. This helps to resolve the change of tone of the sounds as they leave the screen.
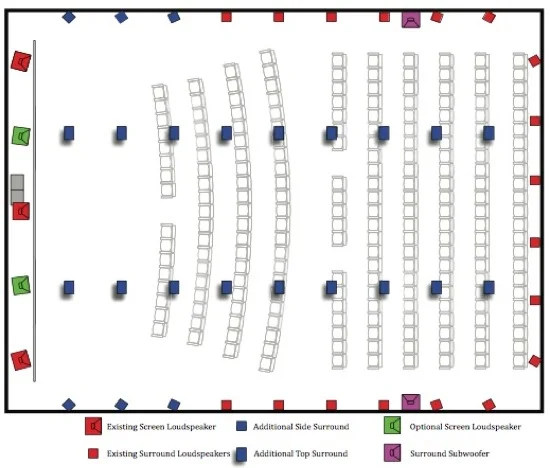
The major difference is that as well as a 9.1 channel based system, every speaker can be individually assigned. This is essential, for the second part of the Dolby Atmos system - the objects. You can have up to 118 objects, that are separate sound elements that, any one of which, you can position around the theatre at will. So a Dolby Atmos mix consists of three primary elements:
Audio Beds: 9.1 Channel-based premixes or stems (including their multichannel panning)
Object Audio: 118 soundtrack elements that can be panned anywhere in the 3D space of the theatre by using the x, y and z axes. Dolby Atmos metadata is used to store the panner automation of the objects. The system takes the objects and uses the Dolby Atmos metadata to steer them around the 3D space. On the mixing stage this metadata is processed by the Dolby Rendering and Mastering Unit otherwise known as the RMU.
When it comes to playback in the cinema the CP850 processor uses the same metadata recorded by the mixers to recreate the object automation in the new space. The aim is to provide the viewer with the same experience as the director intended irrespective of the size of theatre.
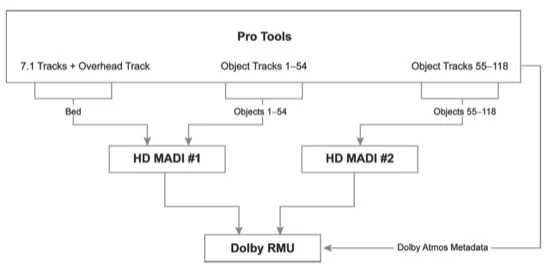
You can see above the typical signal flow from a typical Pro Tools system.
The first 10 outputs are left for the conventional 7.1 bed and if desired a stereo 2.0 overhead channel based output that utilises all of the speakers in the ceiling.
That leaves 54 outputs from the first MADI interface for the first 54 object tracks in Pro Tools and then the remaining objects tracks (55 to 118) are handled by the second MADI interface out of Pro Tools. All 128 tracks go into the Dolby RMU. Dolby Atmos metadata is sent from Pro Tools via ethernet to the mastering unit. The RMU also features 2 MADI outputs. The first 64 outputs are used to feed the speakers. The second MADI is used to output re rendered 7.1 and 5.1 backwards compatible mixes. These include the down mixed object information. The remaining MADI outputs can be utilised to help streamline the deliverables process by providing separate re-rendered Dialogue , Music , Fx and Overhead (OH) tracks.
Software For Dolby Atmos
There are two main software tools for Dolby Atmos, the Monitor Application and the Atmos Panner plug-in.
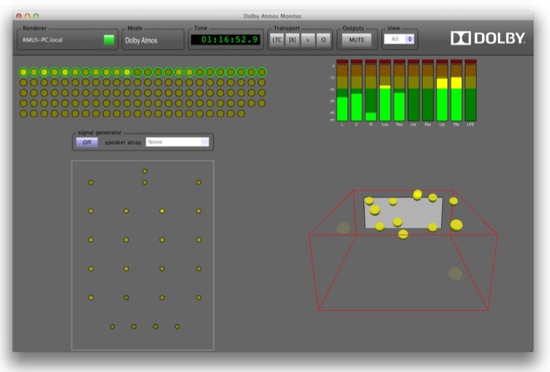
Above is the Dolby Atmos Monitor Application. The yellow dots in top left corner each represent the available Atmos objects. Below this is a plan of the speakers that visualises the presence of audio . The 3D view of the theatre shows each object as it travels around the space. The level meters display the combination of beds and objects. The 7.1 and 5.1 backwards compatibility of the Mix may be checked using the Mode Option.
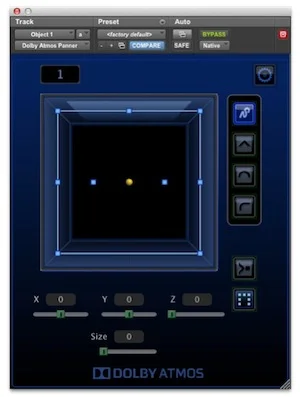
The Dolby Atmos Panner plug-in for Pro Tools is inserted onto each track designated for audio objects. It does not actually affect the audio on the track, that goes out as a mono track to the RMU, what it does do, is to create metadata which is also sent to the RMU, and then the RMU uses that metadata to steer that appropriate audio objects around the theatre.
Neyrinck V-Control Pro
Touch sensitive joystick panners are hard to come by, so what Graham and Adam at Point1Post have done is to use Paul Neyrinck’s V-Control Pro on an iPad to control the Dolby Atmos Panner plug-ins. That enables them to ‘get hold of’ the panner and write the automation data to Pro Tools, which the panner then sends as metadata to the Dolby RMU.
Reverb
One of the concerns we had with Dolby Atmos is how to propagate the reverb around objects, and so I asked Graham and Adam and the answer is to use an appropriate reverb like the Exponential Audio reverbs with Link mode. You can configure the returns back to the 7.1 bed or to be objects as well.This enables you to create reverbs around objects moving around the theatre in 3 dimensions.
Back To Point1Post
Graham and Adam have built a completely in the box solution. They do not use a large format film mixing console, instead their dubbing theatre is centred around two 24 fader D-Command control surfaces controlling a Pro Tools HDX3 and a Pro Tools HDX2 systems, giving them up to 1280 tracks of audio. They work together with Graham handling the dialog, and music on one system and Adam handling foley and effects on the other system, which also handles the recording duties. It is a very clever set up that spreads the load across two Pro Tools rigs and they have both welcomed all the benefits from using HDX and Pro Tools 11. The current set up replaced 2 HD5 and 1 HD3 TDM system. Adam and Graham can now handle far more complex film mixes with their HDX systems and have enough I/O to use outboard equipment if the clients require it.
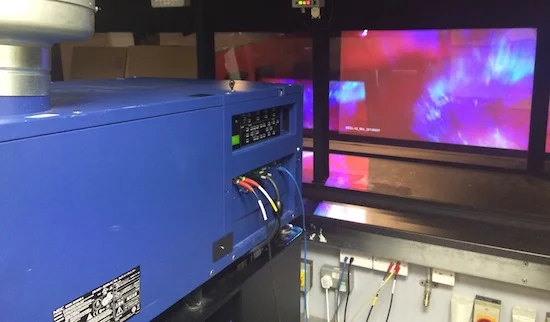
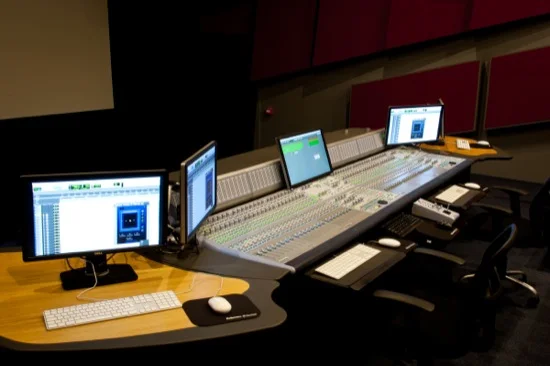
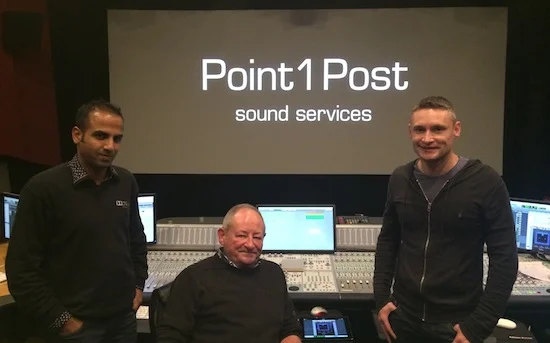
The 2K projector at Point1PostThe two 24 chanel D-Command control surfaces controlling the two Pro Tools HDX systemsTeam picture - from left to right - Peter Mendonca, Graham Daniel, Adam Daniel
Thanks very much to Graham and Adam Daniel for hosting an excellent day and for Peter Mendonca for spending the day with us before shooting off to Greece. We will be producing a set of videos showing the workflow and tools in much more detail in the coming months.