
In this article, Damian Kearns helps you wrap your mind around Preference settings in Pro Tools by explaining how he uses them in his audio post-production workflow, by focussing on 5 key Preference tabs in the Pro Tools Preferences window.

After every Pro Tools update, I run a great little freeware app called PT Prefs created by Pete Gates to reset my Pro Tools Ultimate Preferences. While I recoil a little each time I do this out of fear of forgetting to check something, It’s often the case that I come across newer, better Preference settings that get added in Avid’s updates.
These changes can easily go unnoticed until there’s a problem. The recent release of Pro Tools 2021.3 has once again prodded me to slither into the jungle of preferential options that can either seriously put the bite on my productivity or allow me to really sink my teeth into my workload.
In this article, I am going to concentrate on these panes or tabs in the Pro Tools Preferences Window…
Display
Operation
Editing
Mixing
Processing
Yes I know there are also Metering, Collaboration, MIDI and Synchronization panes as well and they all contain relevant settings but these are less general in nature so instead, we’ll coil our brains around the basics. In each of the 5 tabs, I’ll outline what I change every time I reset my Preferences.
Display Preferences
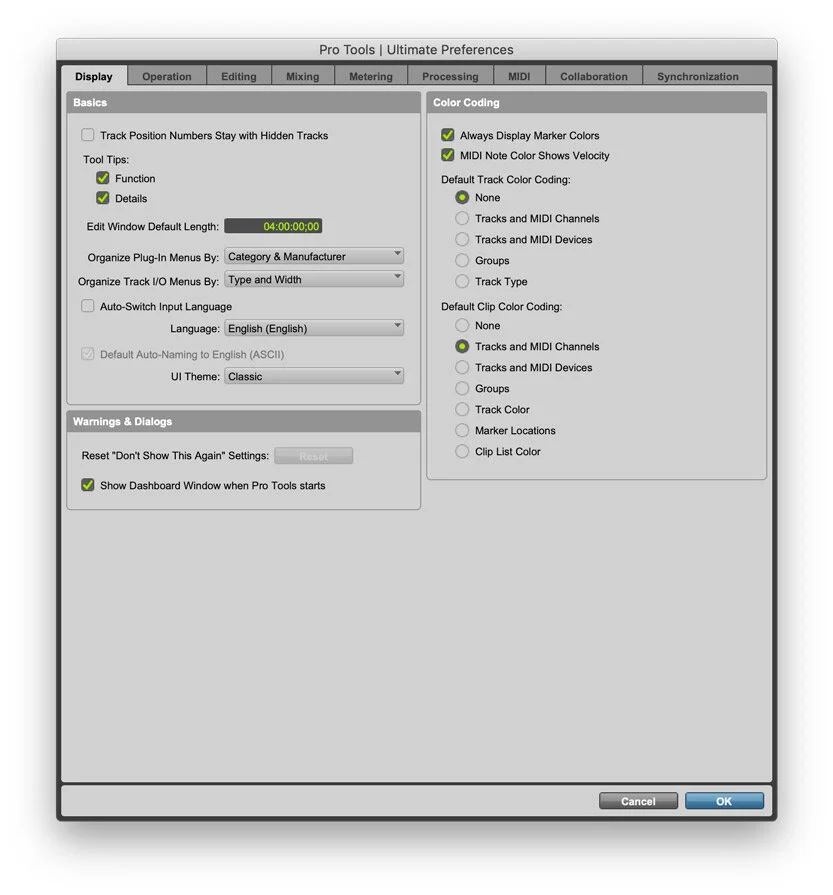
Starting in the Display tab, there are a couple of Preferences I regularly switch from the default to something else.
In the ‘Basics’ segment, I set Organize Plug-in Menus By: to Category & Manufacturer. This really speeds up my workflow especially when I want a specific plug-in and don’t want to scroll through a long list of choices.

I know the plug-in I want is hiding near the top of the list in the manufacturer section of the plug-in list. For those of us with certain hardware from certain manufacturers who populate every plug-in they make into our systems, whether we own them or not, this can make the jungle a lot easier to navigate.

Similarly, I set Organize Track I/O Menus By, to Type and Width. This means when I want to assign a new track to my 5.1 Music Stem, for example, the quickest way to get there is through the 5.1 tree in the output pop-up menu. In a typical post audio project, even with a decent template, I find myself saving time with this Preference every single time I mix anything.
And talking of templates if you want to check out my 5.1 post-production template then go to my article Free Pro Tools TV Post Production Template For 5.1 Projects.
Back to Preferences. At the bottom of the Basics segment, you can switch your UI Theme: from Classic to Dark, for that striking new look. For me, as I’ve been using Pro Tools for decades, I prefer to continue to use the Classic mode but I do switch to Dark when playing back sound-for-picture projects with clients in attendance. I find that the Dark Mode pulls the eye away from Pro Tools and onto the TV or movie screen, where it belongs.
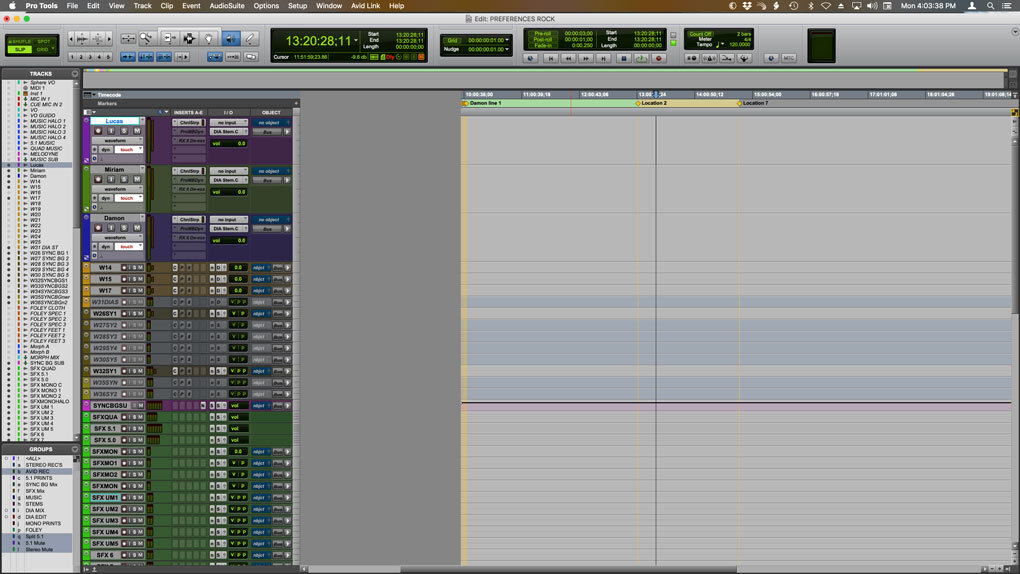
Every snake uses colours to blend into its surroundings or to intentionally stand out. The Color Coding segment helps us define the skin we’re in. It is often overlooked but there is one thing here I want to point out: Markers can be different colours!
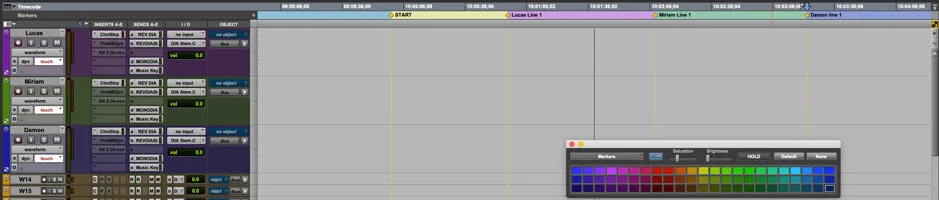
I use the Always Display Marker Colors option in my ADR sessions to give me a visual representation of where each character has a line to perform. The Color Palette can be found near the bottom of the Window menu or opened by clicking precisely on the very bottom colour strip of any track. Not every user may realise that there’s a pulldown tab at the top left corner of the Color Palette window, where you can select your target; in this case, pull down to select Markers.
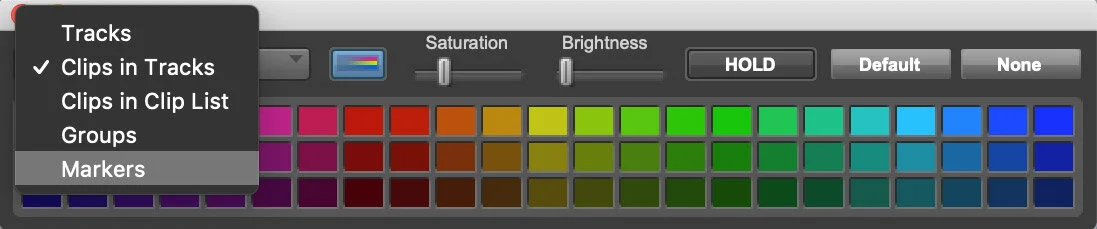
If you wanted to make a bunch of green markers all at once, you can select the green you want and select HOLD near the centre at the top of the Color Palette. Creating new markers defaults to them being different colours but since we have our preferred colour on HOLD, we simply click the marker and then the held colour on the Color Palette. Clicking a marker and then the Default button restores the default colour to the selected marker. None turns it, Grey, in Classic UI Theme.
By mastering the Color Coding preferences and the palette, you can really keep things organised in a way that works for you. I’ve been using the same colour scheme so long, I know where I’m at and what I’m on even in my peripheral vision. Using colours to your advantage can really help make the Pro Tools UI less constricting.
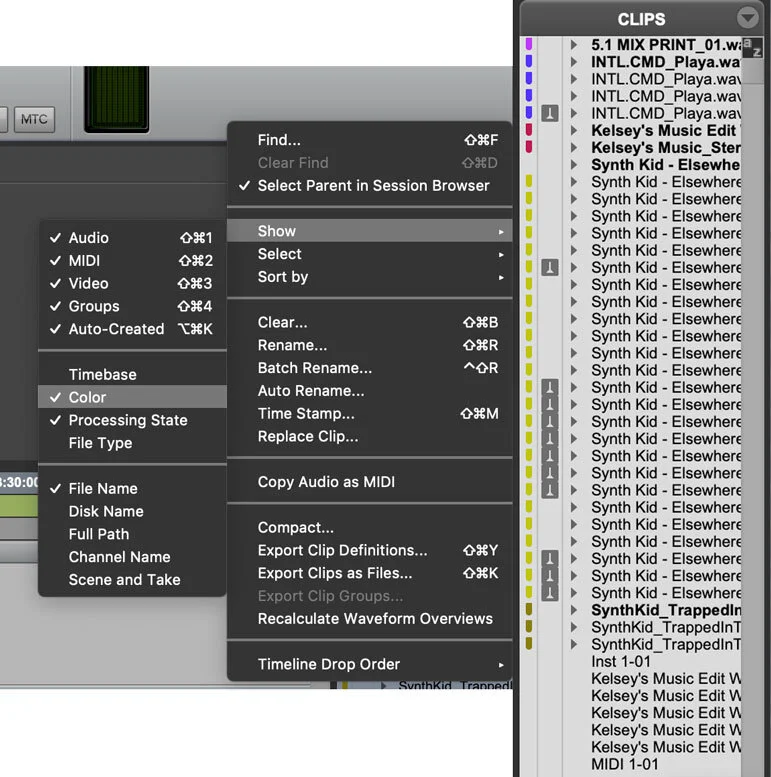
Interestingly, there is an option to assign colours to clips in the clip list. Though it’s hiding a bit of menu searching in the Clip List allows us to Show and check Color. Once found, we can now see the narrow strip of colour blocks to the left of the clip names.
Operation Preferences
It may sound a little strange, but I don’t really change much on this tab. The default settings are pretty good for my workload.
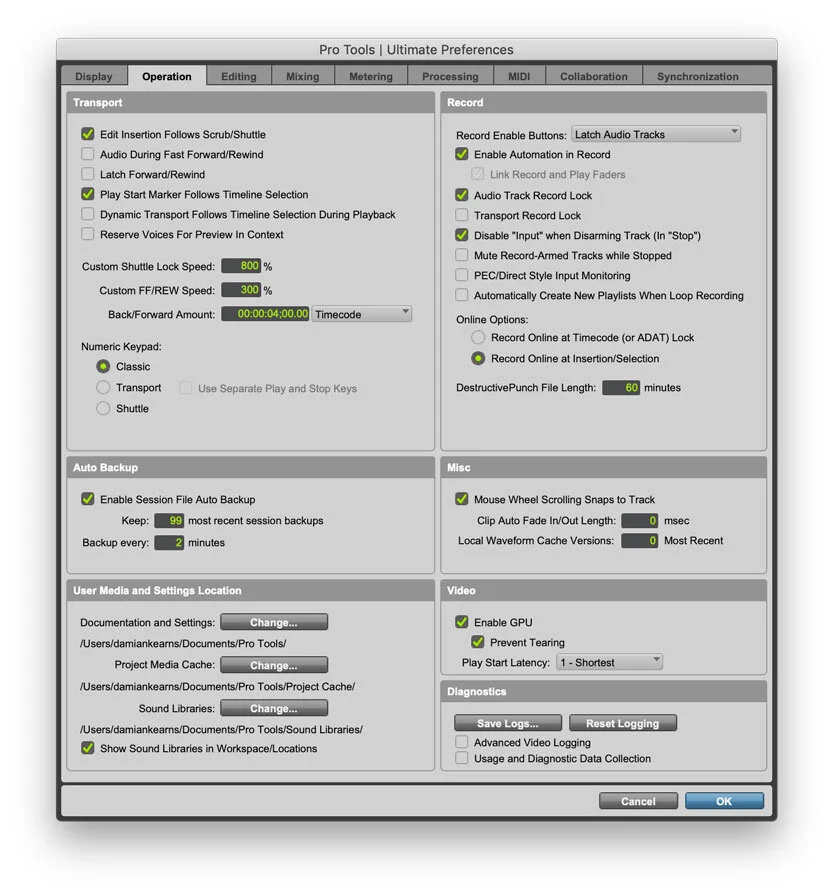
Transport
In The Transport segment, I bump the Back/Forward Amount up to 4 seconds because I use “Back and Play” constantly when I’m mixing and 4 seconds seems like a comfortable roll up time. If you don’t have a surface to program this handy function, you can Option+Command+Rewind (on the Transport Window) on a Mac to achieve the same result.
One thing I do leave in place is the Classic Numeric Keypad mode. For those users working off of laptops, this section is probably quite useless but I have a rationale I want to share here. I have a Transport and I can Shuttle things with my AVID Dock. I don’t need the numeric keypad for transport or shuttle control and have actually never ever used anything but Classic mode. The reasons for this mode are…
I can recall my markers by typing the marker number and then period (.)
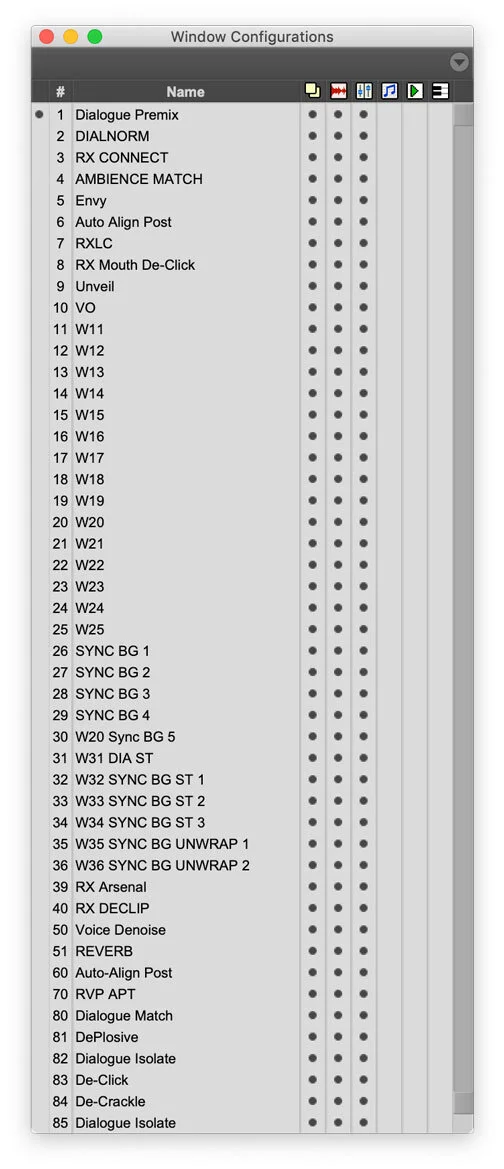
I use Window Configurations.
The quickest, easiest way to recall a Window Configuration is by typing the number and then the asterisk. For example, in my templates, RX Connect is my third configuration, so I type 3* and RX Connect pops on the screen.
If you’ve never messed with Window Configurations, set up your windows the way you want, hit 1 and the plus sign (1+) on the numeric keypad, then close all your windows and recall the Configuration with 1*.
This is what happens when I do this. All my Dialogue editing tools pop up. Note that this does not happen in Transport or Shuffle mode. This rather sneaky little trick allows my tools to pop up and strike the UI quickly before I even have a chance to blink.
Auto Backup
Quickly breezing through Auto Backup, I bump things up to 99 most recent session backups and Backup every: 2 minutes. Why? My rationale for this harkens back to working at two major Toronto-based Post Production facilities in the 1990s. The power grid in the area was taxed like you wouldn’t believe, probably owing to the high concentration of recording studios in the ‘Studio District’. Power browned out or completely blacked out from time to time; more than one would hope or expect.
At Deluxe Toronto, I worked Theatre 4 as its operator, assisting the re-recording mixers. I was always hitting SAVE on the Euphonix 2000-F console over the mixers’ shoulders when they’d turn around to talk with the clients. One day, a massive brownout hit, and someone asked me “How much did we lose?” “About ten minutes of work,” was my response. We were by far the luckiest of the handful of mix theatres that particular day.
My backup regime has been pretty stringent since then. I actually do full session copies including all media and plug-in presets to another removable drive every two hours during the day, on top of the Auto Backup. Things happen. It sucks to go backwards. Avoid the venomous sting of lost time.

Record
In The Record segment, I always enable the Enable Automation in Record button. I love this feature. It is so handy for semi-live mixing situations, which I will return to, a little later in this article.
The only other Operation Preference I tweak in the Record segment is the Online Options: I prefer Record Online at Insertion/Selection so that when I chose a spot to plonk my cursor on my Pro Tools Edit Window timeline, that’s where Pro Tools goes into Record. A million years ago when I used to use Machine Control with multiple tape machines slaving to Pro Tools, this made a whole lot of sense.
Editing Preferences
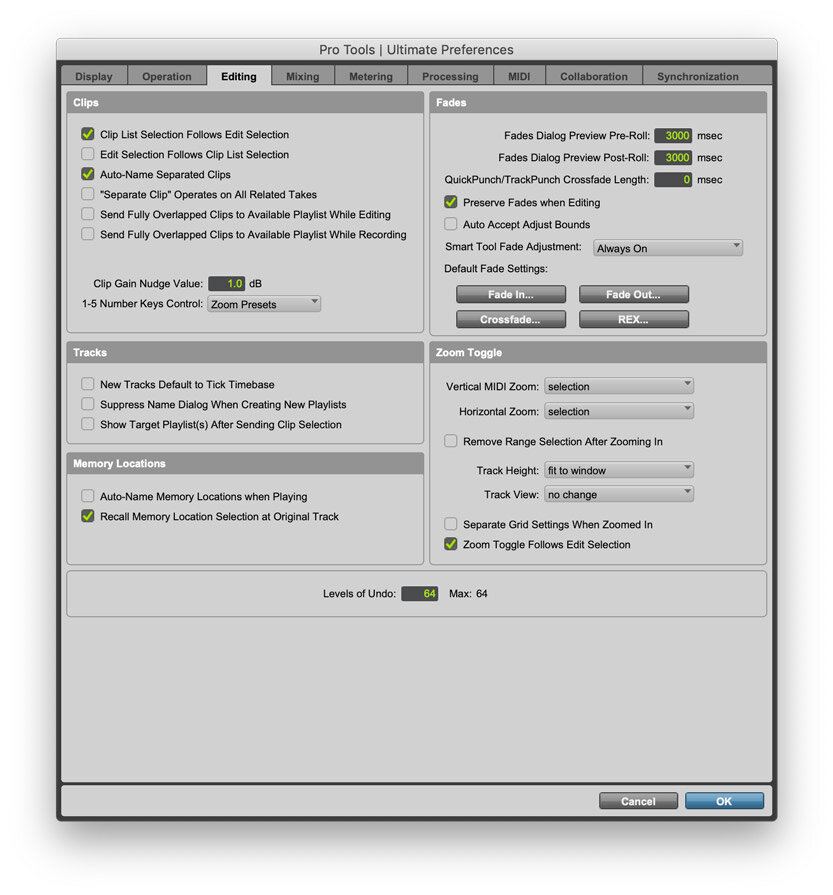
Clips
First thing’s first. In the Clips segment: I always turn off Edit Selection Follows Clip List Selection. This is one of the few Pro Tools Preferences I feel should default to the ‘off’ state, that currently defaults to ‘on.’ It quickly becomes a problem when you go to select things in your Clip List and your Edit selection in your timeline shifts. I really don’t see how this one is useful, most of the time. That said, I find it does come in handy when I’m searching through voiceover takes and I want to see which one I used in a fairly dense timeline. That’s about it.
My Clip Gain Nudge Value is usually set to 1.0 dB, as I find when I’m doing double the clicks if I use the default 0.5 dB. Just this one workflow mod saves a lot of fooling around.
What is really interesting in this particular section is the fact that the 1-5 Number Keys Control can be changed from Zoom to Clip presets. I can see that being really useful during the premix and mix stages. It’s definitely something I’d consider doing. Just to be clear: These are 1-5 on your main keyboard, not the numeric keypad.
I already have mine programmed for specific fades, log and linear, for music editing using ‘Soft Keys’ on my Dock or I’d really look at this as a potential future use case. I might just do a page of soft keys dedicated to recalling Clip Presets to try to incorporate this Preference.
Memory Locations
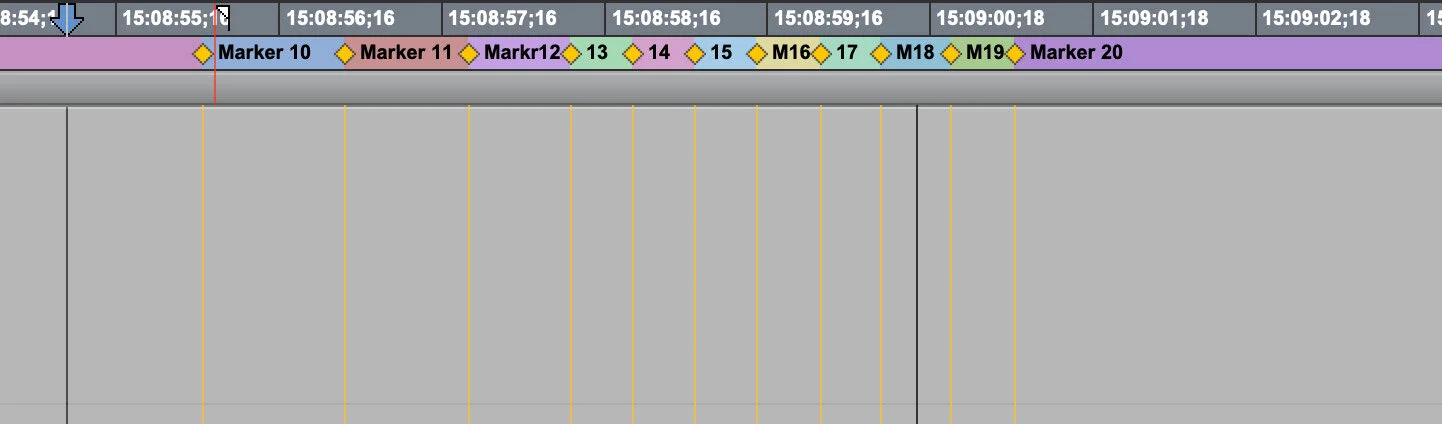
The Memory Locations segment has a couple of powerful little checkboxes. The first is Auto-Name Memory Locations when Playing. This is one Preference I toggle on and off like a reptile occasionally flipping her eggs. It’s very handy to have the memory location box pop up while I’m laying down voiceover in a recording session so I can scribble some note or name. But if I want to work through a scene in real-time and drop markers for every gunshot, flash or footstep, engaging this Preference means the Memory Location box won’t pop up every time I hit Enter on the numeric keypad. That means I can lay down a load of markers quickly.
If visual events happen quickly, I sometimes select half-speed playback using Shift+Spacebar, through a scene and drop markers that way. One of the earliest systems I learned to edit post on, Studer Editech’s Dyaxis IIi, only dropped markers without any sort of window popping up so I tend to have this box checked a lot still out of habit. Note the auto-named ones are all called Marker instead of Location.
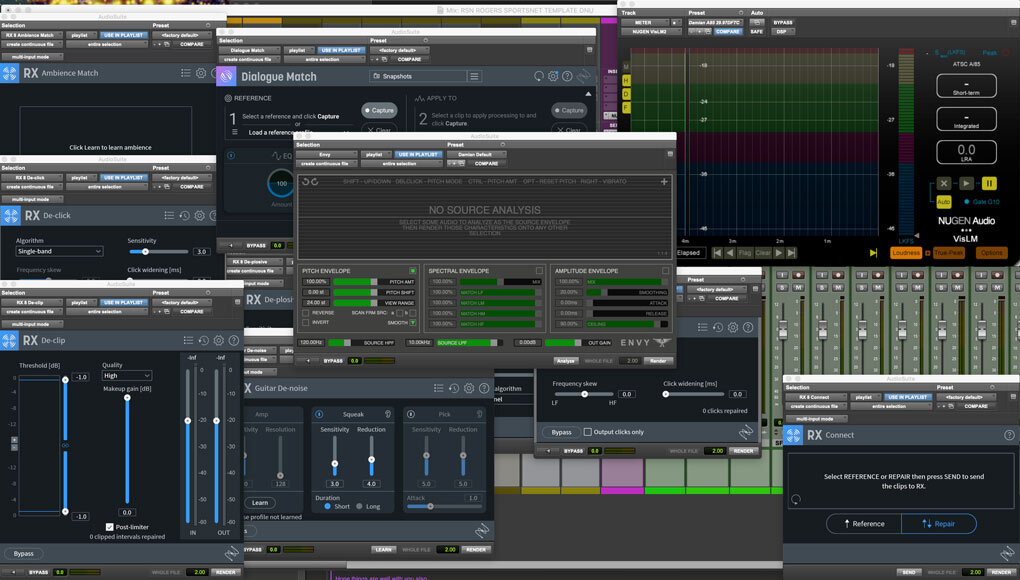
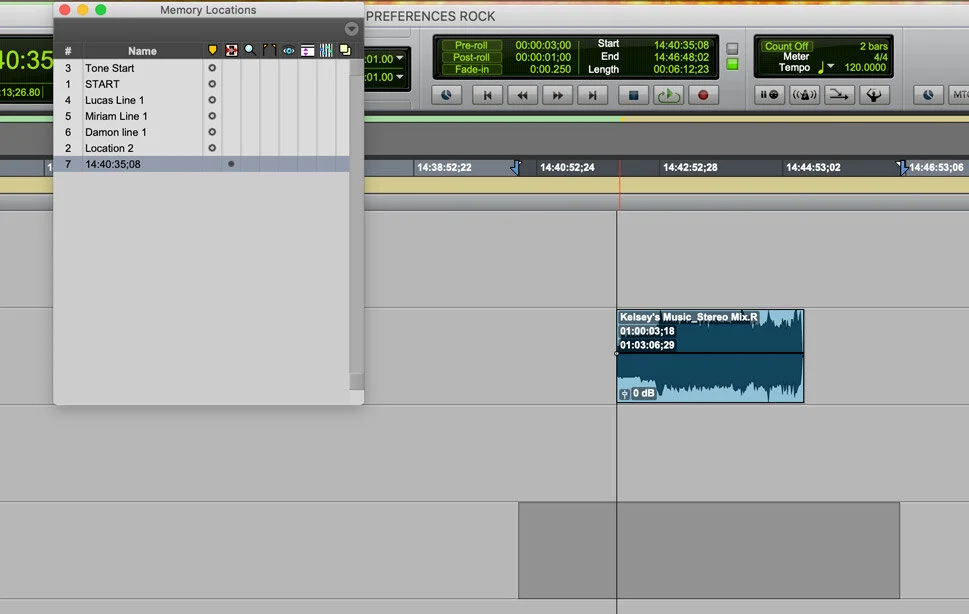
To understand Recall Memory Location Selection at Original Track, you’ve got to understand that markers can be a variety of things. If you check this next picture out, you’ll see I’ve made a selection on the timeline and created a marker but changed the time properties from Marker to Selection. Really useful.
Rather than that timecode number you see, I typically rename the marker for whatever piece of dialogue or effect I want to hold as a selection. This selection marker won’t show up in the Markers ruler above the timeline but it will show up in the Memory Locations list near the bottom with a dot in the second column.

If I uncheck Recall Memory Location Selection at Original Track, I can recall the selection but it won’t necessarily snap me back to this selection. If my marker is on a different track or tracks, that will be the selection.
Sometimes my selection markers recall selections made across multiple adjacent tracks so this Preference is best left in its default position. This picture illustrates what I mean. Not exactly a timesaver if you’ve got to redo the selection every time! Interestingly enough, if I’m in Classic mode on the numeric keypad, to recall this particular marker, I need only type 7 and Period (7.). Nice bit of sidewinding back to an Operation Preference!
Climbing back up the tree a little, I want to bypass the Fades segment because that’s all pretty clear and changes radically depending on the application. Just below, Zoom Toggle is one of the most fundamental parts of my particular workflow.
With a simple press of the ‘E’ key on my keyboard in Commands Keyboard Focus mode, (check out our article Command Focus Keyboard Shortcuts In Pro Tools for more on this) I can stretch out my Edit selections to fill my screen. This is what I want, most of the time, while I’m editing dialogue, music or sound effects. For it to truly be a toggle, I want it to blow up and then snap back to how it looked before I hit ‘E’ the first time.

To achieve this, just make sure the Track Height is set to your best, most comfortable zoom magnification. In my case, it’s fit to window.
Track View: needs to be set to no change to properly return to the state before the zoom occurred. There are cases for not having this happen so this is a cool place to experiment until the zoom toggle function works the way you want.
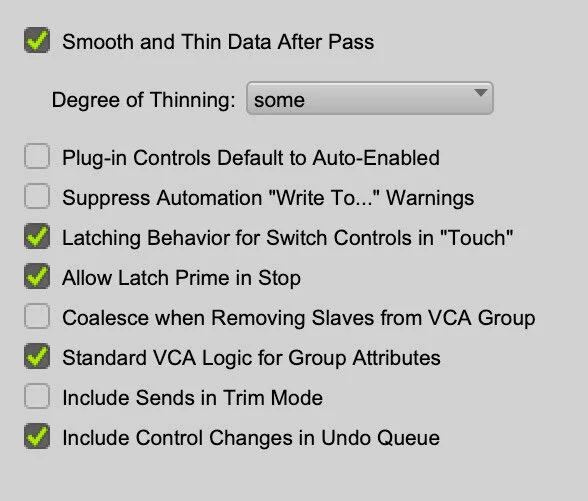
Mixing Preferences
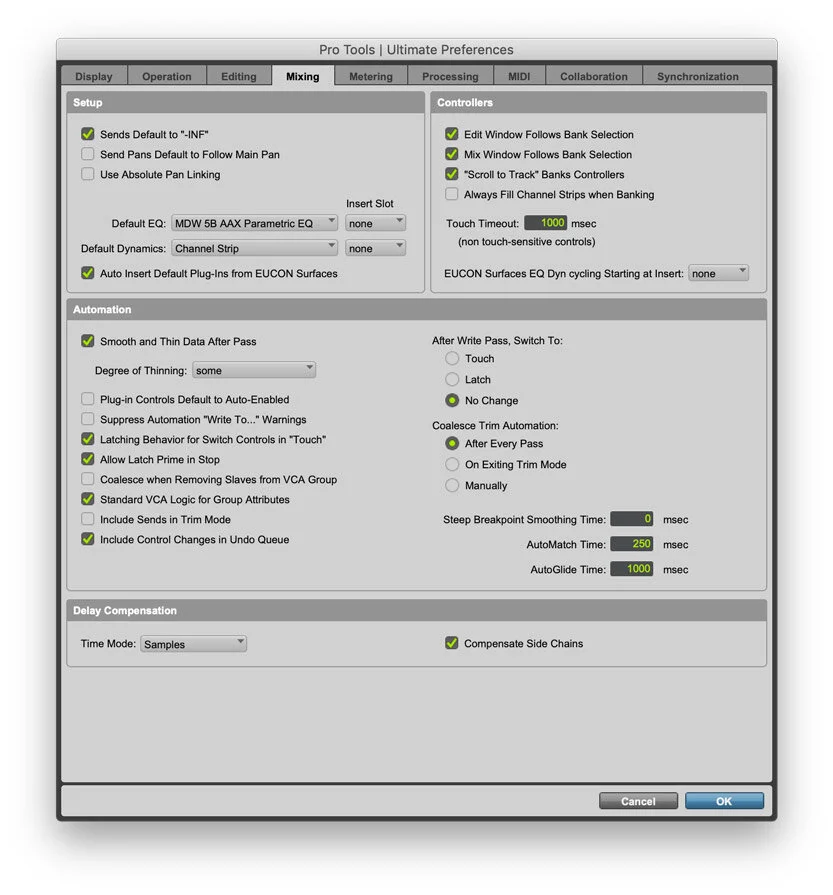
The bulk of my work does indeed lead to a mix of some kind so I usually spend a little time here squeezing the settings until they fit my mixing style, which comes from the 1990s. My earliest mixes were on large format analogue mixing consoles and I even spent a year working off a vintage Neve console that had no automation.
Working without automation is counterintuitively an excellent way to figure out what automation parameters are actually worth fretting about. For instance, do I want to set my faders to some sort of predetermined levels before I start rolling on a sports commentary record in a semi-live mix situation? There’s a Preference for this.
We can see here in the first segment, I like to set my default EQ and Dynamics so I can quickly assign them in my Mix or Edit Window. Curiously, I set AVID’s Channel Strip as my default dynamics choice. I use this handy plug-in a lot so that seemed the obvious place to hang it. If Avid had included a Default Channel Strip option here, things would look a little different.
Automation is a tricky business. Most of the standard settings work well enough for me because I like to auto-enable my plug-ins manually, more often than not, omitting the ‘bypass’ control. This is so I can review what I’ve done without actually automating the in/out of the bypass switch. Latching Behaviour for Switch Controls in “Touch” also makes a lot of sense to me, since I know from experience that these controls tend to keep trying to pounce back to their original positions otherwise and it is really annoying.
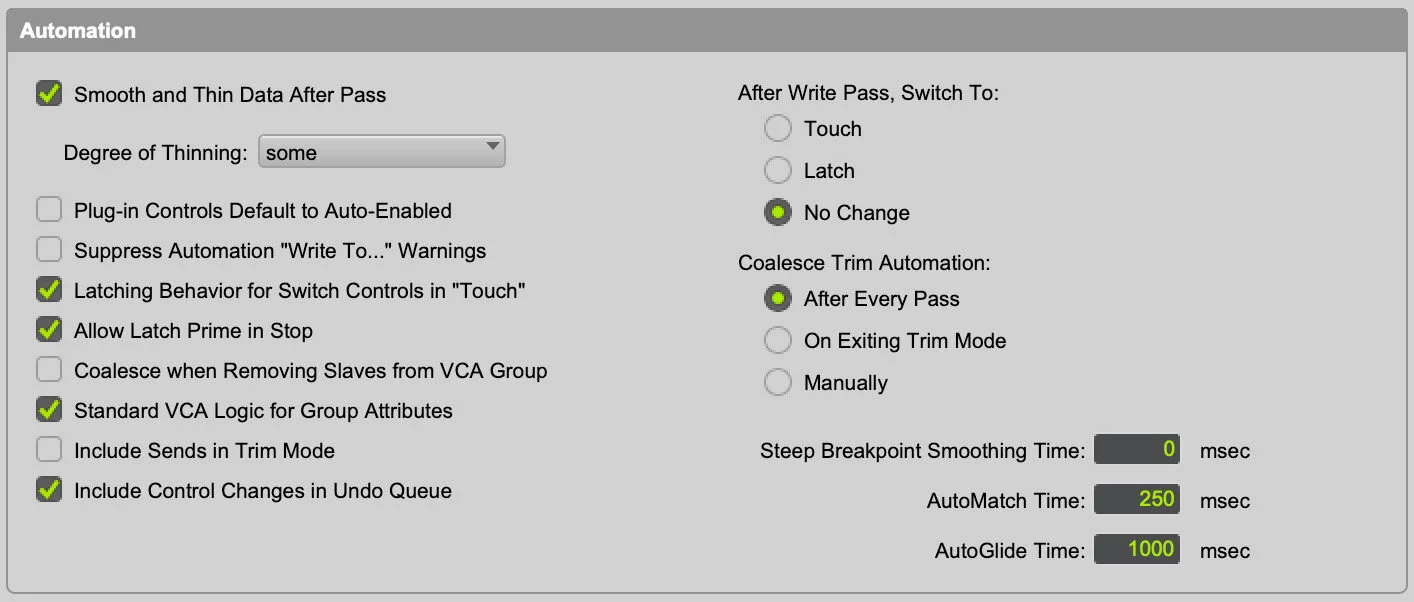
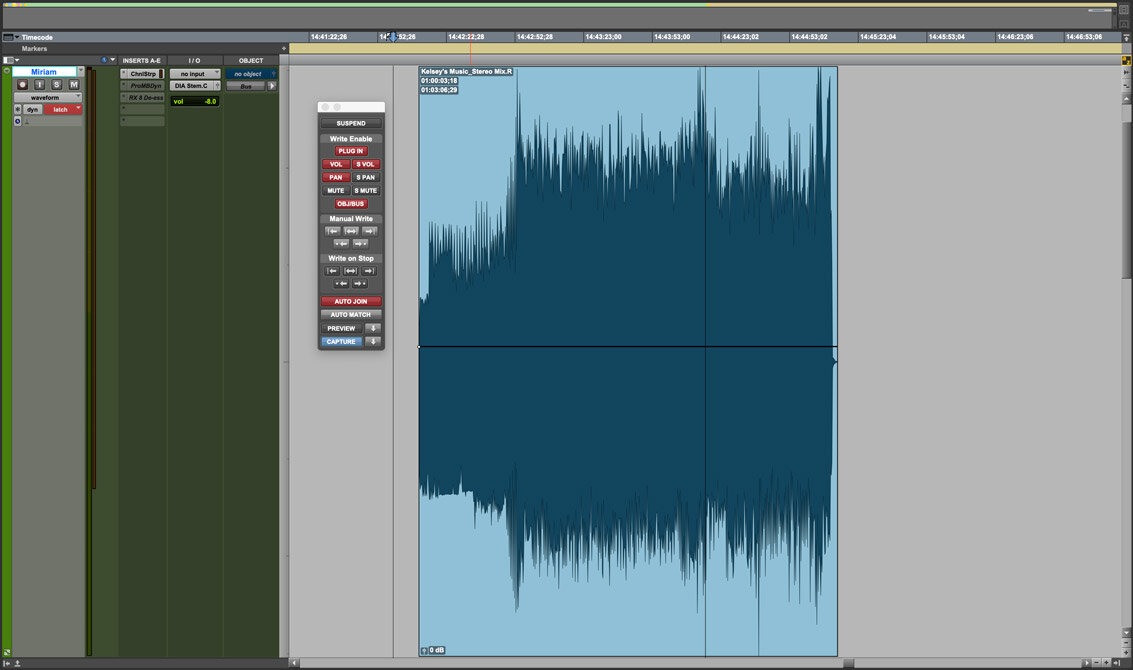
Remember just moments ago when I wrote about learning to mix without automation? Allow Latch Prime in Stop really harkens back to semi-live mixing for me. I sometimes record sports commentary here in my studio and the hosts rely on a ‘live’ mix to help maintain their enthusiasm. For these sessions, I typically have Auto Join engaged in the Automation Window, as many of my channels are in Latch mode.
Latch means if I move a fader to a different level, it will hold that level until I hit Stop. Auto Join means when I hit Play again, the levels I stopped at are going to be the levels I start up with. Very useful for long format mixing but sometimes I want to reset a level before I start up again. Allow Latch Prime in Stop allows me to do exactly this.
Below, we see I turned Miriam down 8dB while the transport is parked. The ‘latch’ automation button on her channel is now red. This means, when I start up again, Miriam will start 8 dB down and will write that level until I change the level or stop playback. This is very much like working with tape without console automation. With tape, we used to stop, change our levels, pans, sends, etc. and then roll and punch in to continue mixing.
Side note here: In some instances, rewinding was so slow it allowed mixers to set their EQ and compression while they were waiting for the tape to recoil to the top! Very snakey!
Moving down the list, I arrive at one of my favourite checkboxes to switch off! Include Sends in Trim Mode might just be the one Preference that speeds up mixing the most, when it’s turned off.
I work in automation Trim Mode all the time since I premix everything carefully prior to my final pass. It is never the case that I want my sends in this mode as well as my faders since I’m quite often applying reverb for the first time in my final pass or I really dramatically want to change the amount of reverb I am sending from a particular track.

If I didn’t have this Preference turned off, I’d be constantly flipping from Trim to Touch automation. Below, you can see my ‘W11 Dia 1’ (window configuration 11, Dialogue track 1) fader is in Trim but the send to my reverb is not! This is the best thing ever! It’s really timesaving to have my Dock’s fader in Trim and use the hardware knobs as Sends pots at the same time without having to toggle Trim on and off.
The last thing I’ll mention about this section is that I don’t like my automation changing from Write mode to anything else while I’m working away. I set my After Write Pass, Switch To: Preference to No Change.
As an example, It is very typical for me to stay in Write mode on reverb tracks for multiple looped passes so any other setting here would be counterproductive. Again, I consider my reverb and delay plug-ins as “outboard gear” and it was never the case that this stuff could be automated during a mix when I first started to learn the craft of post audio mixing. On our outboard effects boxes, we were continually changing the settings parameters as we progressed through the mix; often storing snapshots of settings so we could recall them. I do love to record automation for almost everything now but I like my reverbs and delays in write mode as I loop a section of the movie until I have the basis for the sounds I’m trying to achieve.
Processing Preferences
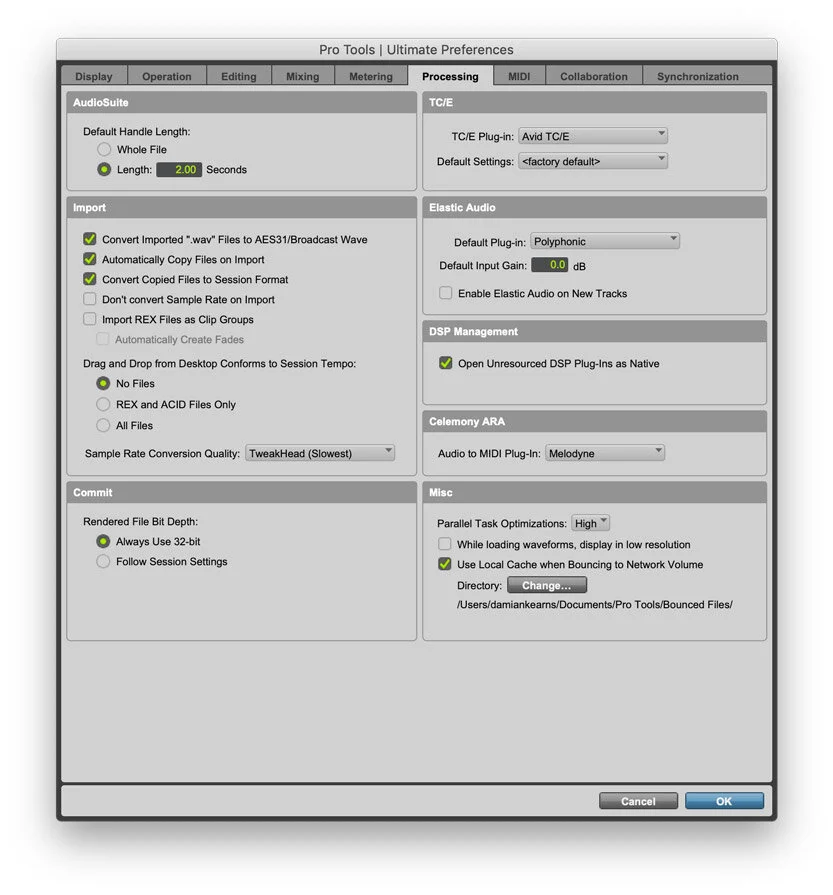
These Preferences can prove toxic to your session and the fact that they are hiding on the 6th Preference tab is a bit of a mystery to me. One would think processing would be the primary jumping-off-point for any session.
I was inspired to write this article by reading multiple online posts by people who were having operational problems that could be resolved by the right checkbox in this section. Let’s take a look at my Processor Preferences settings, to see if we can resolve some of these problems.
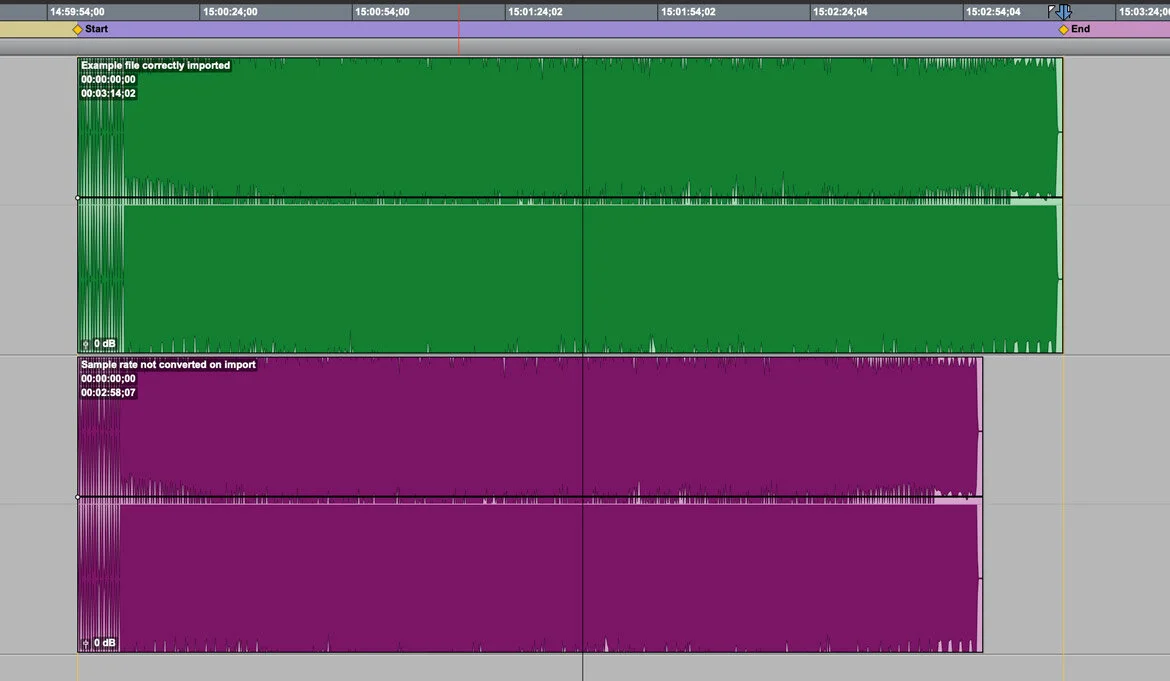
Years ago, I figured out just how vital it is to have a handle on the ‘Import’ segment. I received files from composers that when I imported them, just weren’t long enough. The culprit was Don’t Convert Sample Rate on Import. You can see below, what happens to music when a 44.1 kHz file is imported to a 48 kHz session with this box checked.
The file is sped up so that it is 44,100 samples are played out 48,000 samples per second so your audio will all be shorter. This also has an effect on the pitch too. The poorly imported file is shorter and higher in pitch than intended as you can see below in purple…
Some audio files also have REX and ACID information encoded in them. These will try to play at session tempo when that was not intended. So if these things are problems you face, my suggestion is to convert, copy and don’t conform anything to the session tempo, which 95% of the time in post, is set to the default session tempo of a swift 120 bpm.
T/CE
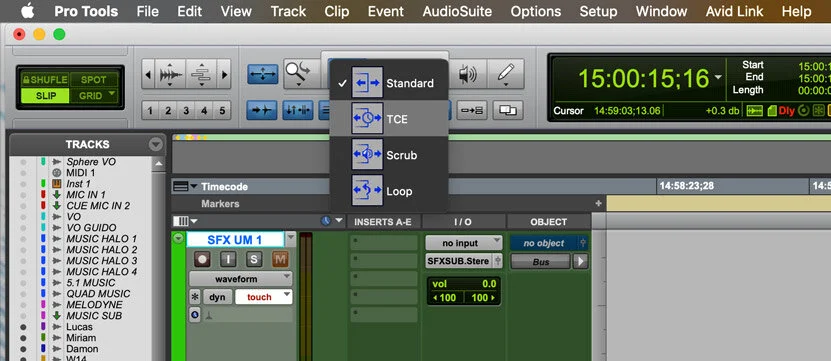
The TC/E segment is one I wish defaulted to Avid TC/E instead of Avid Timeshift. It’s worth playing around with the T/CE Trimmer Tool and swapping these settings until you find an algorithm that works for you. You will most certainly hear differences.
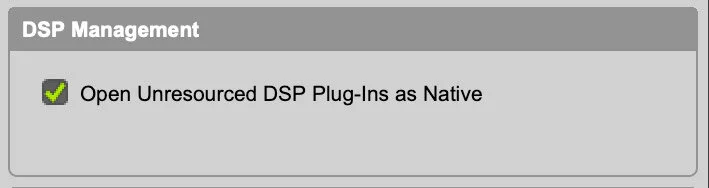
DSP Management
The final segment I want to look at is DSP Management. Open Unresourced DSP Plug-ins as Native is one of the commonly overlooked settings I see on other Pro Tools systems.
More often than you might believe, when I bring a session from my HDX system to another studio, I find myself having to engage this Preference. This is another one of those “Why isn’t this box checked by default?” questions I have.
If I have more DSP plugins than the host HDX system is capable of instantiating, plug-ins will be made inactive. It’s typical for me to open up a bunch of folddown tracks containing a downmixer and possibly a limiter, after a mix is approved, to print multiple stems simultaneously.
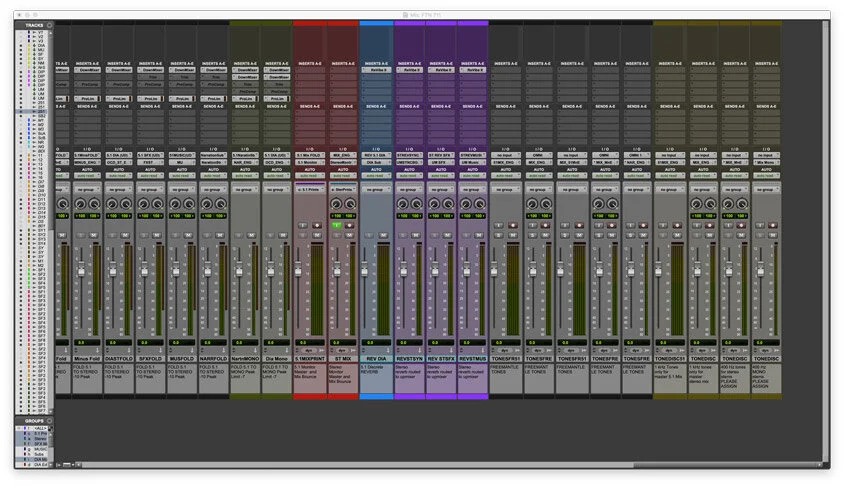
When I do this, I notice some of the tracks turn on but without plug-ins active. A quick open and close with this critical preference checked off and everything is engaged again, albeit with some of the plugins converted to Native. If you’ve had this happen, you’ll also notice it tends to be the DSP plug-ins at the bottom of your Pro Tools session that convert from DSP to native first.
A wise thing to do is put your folddown tracks, or reverbs, at the bottom of your session. The purple tracks below were all converted from DSP to native when I opened up this session.
In my workflow, all my mix and stems files are created using Offline Bounce. Offline Bounce only uses the native versions of plug-ins to process files so why would this DSP Plug-ins as Native thing matter?
Well, if a plug-in is bypassed before you bounce, Pro Tools doesn’t care whether it was DSP or Native to start with. The plugin won’t be engaged in processing. It’s for this reason alone I open and close my session just before I bounce and scan the MIx Window thoroughly to make sure everyone is active and working.
Misc
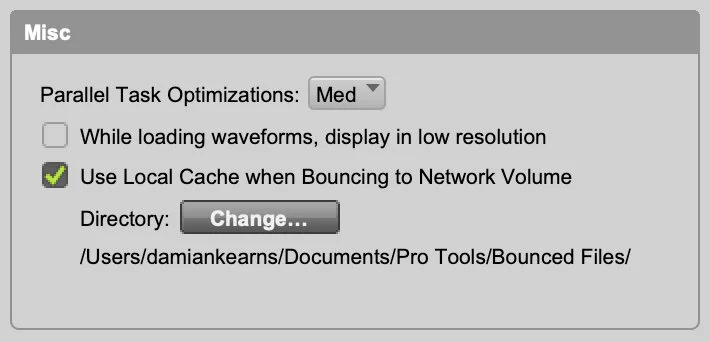
Missing from the initial release of Pro Tools Standard 2021.3 was the “Parallel Task Optimization” option in the Misc segment. In the Pro Tools 2021.3.1 release, this preference is restored.
As far as Preferences go, this one can really reduce the time it takes for multi-threaded background tasks to complete. In its default “on” setting, as many as 8 tasks can happen simultaneously. Depending on how many processors you’ve got in your computer, you might want to consider lowering this to ‘Med’ for 6 tasks, or ‘Low’ for 4 tasks.
It’s a relatively new Preference so on my iMac Pro, I’ve set it to ‘Med’ for now. If you’re running off a server, a slow computer or a very full hard drive, you might want to consider ‘Low or Off.’
The “Use Local Cache when Bouncing to Network Volume” is an interesting addition in terms of preferences. Caching locally is smart because networks don’t always prioritize tasks in a linear fashion and certain networks do not prioritize audio as we think they should.
Caching locally makes sense since your bounce can be spoon-fed to a network server without slowing down the bounce itself. I’m in favour of this and I’ll keep it set to ‘on’ even though it has absolutely no value for me in a home-use setting.
If your network is merely a couple of computers, or you’re trying to print to Dropbox as it auto-syncs what you’re bouncing out, you’ll find this Preference really doesn’t do anything. But for larger-scale operations, this has the potential to speed up your bounce time even when your ability to transfer your data to the server is less than optimal.
Conclusion
Though it’s never straightforward to figure out how to optimise a feature-rich piece of software like Pro Tools, my hope is by working our way through the logic I apply to my setup, you have found a few useful new ideas to wrap your brain around.
