
In this article from our friends at iZotope, Nick Messitte looks at audio metering and asks what is metering for in mixing and mastering, what is metering for and how do we use metering.
In the twin practices of mixing and mastering, we often speak of the meters, particularly after making bold decisions. "How does that look on the meters?" I might say to myself, usually after midnight, when I’ve been mixing so long that I have no idea if things feel squashed in the mix or merely in my head.
Conversely, if I’m compressing the drum bus, I might ask myself, “how much gain reduction is this showing on the meters?” When mastering a tune, I might think to say, “how loud is this reading on the meters?”
Meter talk even affects my recording parlance: Say I’m running a guitar through a preamp whose sweet spot occupies the top of its LED-segmented meters. Here I might ask myself, “Am I filling the meters?”
Such talk leads us to our question du jour: what is metering in the mixing and mastering process?
To some extent, the answer is simple: Metering, in these contexts, is any visual aid (preferably established by our forebears) that shows us where we stand. Meters don’t help us judge aesthetic concepts; rather, they measure events pertaining to the science behind. As such, meters help us make better decisions, particularly regarding levels, frequency content, stereo spread, and dynamic range.
With this established, let’s get into a brief overview of the meters we use.
Levels
Level meters are arguably the most prevalent meters we come across. They’re found in DAWs, outboard piece, and physical mixing boards. They show us a signal’s strength; put another way, they display how level a signal happens to be at any given moment.
But how the moment is given to us, and how this moment of signal strength is quantified and measured—therein lies a world of confusion.
By definition, VU meters, implemented long before the digital epoch, tend to take longer to read the level of a signal (around 300 milliseconds). Conversely, they take longer to register when a signal has dropped to a lower value (again, usually around 300 milliseconds). This makes them credible tools for taking the average temperature of a signal, be it a mix or a single element like a vocal or a bass.
You might not have a conventional VU meter, like the one pictured below, in your DAW, though you’ll see them still on many outboard compressors. Your DAW’s RMS meter serves a roughly similar function, as it aims to portray the average strength of a signal, rather than its moment to moment peak value.

But these kinds of meters aren’t as helpful for seeing, measuring, or quantifying the momentary transient, which is necessary for making sure you don’t overwhelm your mix/master, or hit your digital ceiling.
In these cases, engineers used to use PPM meters but we have largely migrated to loudness metering for averages and true-peak metering for catching the quicker hits.
I don’t have room here to relate how loudness metering came to be, how a loudness unit (LU) was established (think of it like a dB that takes the context of frequency and dynamic history into account), but I have no qualms in telling you that it is my preferred method of level metering, because it is so versatile.
A LUFS loudness meter always gives you three different readouts—momentary, short term, and integrated—and they’re all incredibly useful. If you’re mixing a podcast or a dialogue scene for a film, momentary readouts help you judge the consistency of the voices, thus helping you make decisions to juice the gain so you don’t lose a word at the end of a sentence. Integrated loudness helps you judge the overall loudness of programmatic material—of a song, a film, an episode, etc.
Short-term loudness, on the other hand, is quite helpful for judging the overall level of a mix or master, especially in reference to other mixes/masters.
Loudness meters frequently feature a loudness range indicator, which show you the difference, in loudness units, between your quietest and loudest points; this is great for getting a feel for your overall dynamic range.

A metering suite like iZotope’s Insight provides all of this loudness metering and more—including loudness history charts, and a true-peak meter for making sure you’re avoiding intersample peaks—nasty distortions that can be created in the digital to analog conversion process if your signal is running too close to the digital ceiling of 0 dBFS.
Frequency
As we have meters to help us judge level, we also have meters (visualizations) to help us judge frequency content. The most common one is the spectrum analyzer, which shows us, on a two-dimensional plane, the frequency makeup of our mix.
At the left of a spectrum analyzer sits our bass content, and at the right sits our high-end. From left to right, we see the specific order of lows to highs. That’s our X-axis; our Y-axis (the vertical plane), shows us the amplitude of these frequencies, in both positive and negative values.
We use these meters to help us achieve tonal balance, but it’s important to note that balance doesn’t equal a flat, zeroed out response on the spectrograph. There is, depending on the music we’re addressing, a slope to the sound we’re looking for, with greater values in the lows than the highs.
The spectrum analyzer, along with an adequate reference track, can help us make decisions as to whether there needs to be more/less of any given frequency band in the mix or master. How we decide to implement the change will vary depending on the material, but the choice can be made with the meter alongside our ears.
Sidenote: iZotope has recently released a smart sort of spectrum analyzer which provides useful animations to help us ensure we’re balanced. This tool is called Tonal Balance Control, and it comes in quite handy—all plugging for an iZotope blog aside, the TBC module now sits between Insight and Sonarworks’s headphone calibration system in my monitor chain.
Phase
We often come across polarity, phase, and stereo meters in our practice. These measure two signals simultaneously to determine whether they are in phase with each other. Some offer pictorial representations of what the stereo-plot looks like as well. However the meter looks, it is essential for making sure we’re fashioning a product that can translate to all systems, from the highest of the hi-fi to the lowliest mono iPhone speaker.
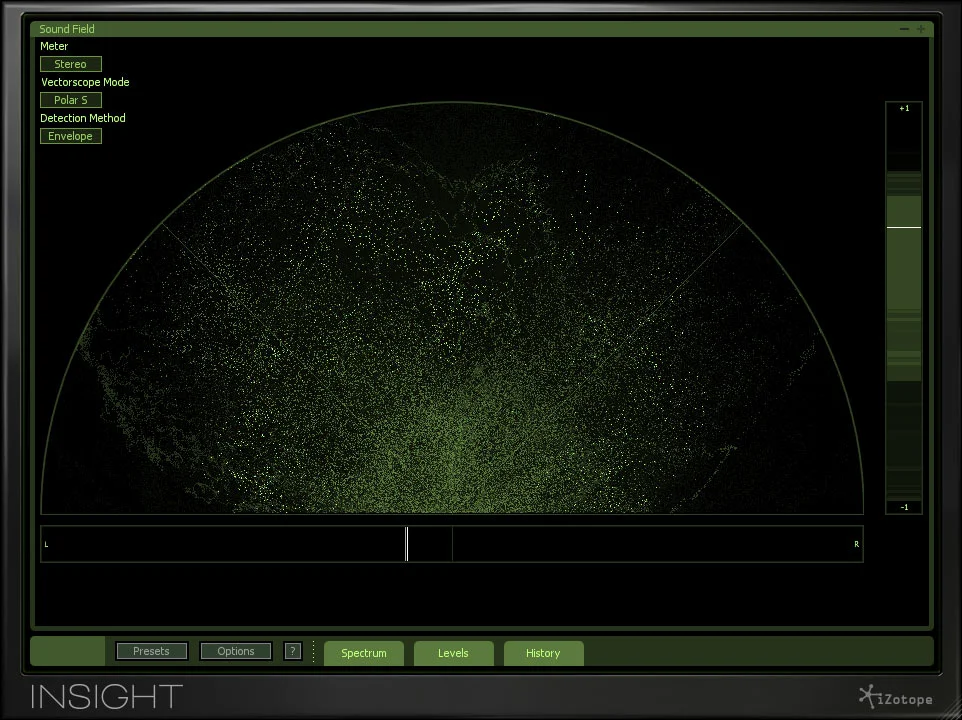
Pictorial meters such as the vectorscope give us excellent visual aids and representation of phase correlation.
I use a phase correlator for judging the big picture on mixes, groups of instruments, and other global musical phenomena. For instance, you might like how wide a mix feels now that you’ve applied some stereo processing. However, there’s a possible downside: perhaps you’ve pushed the boundaries of good taste.
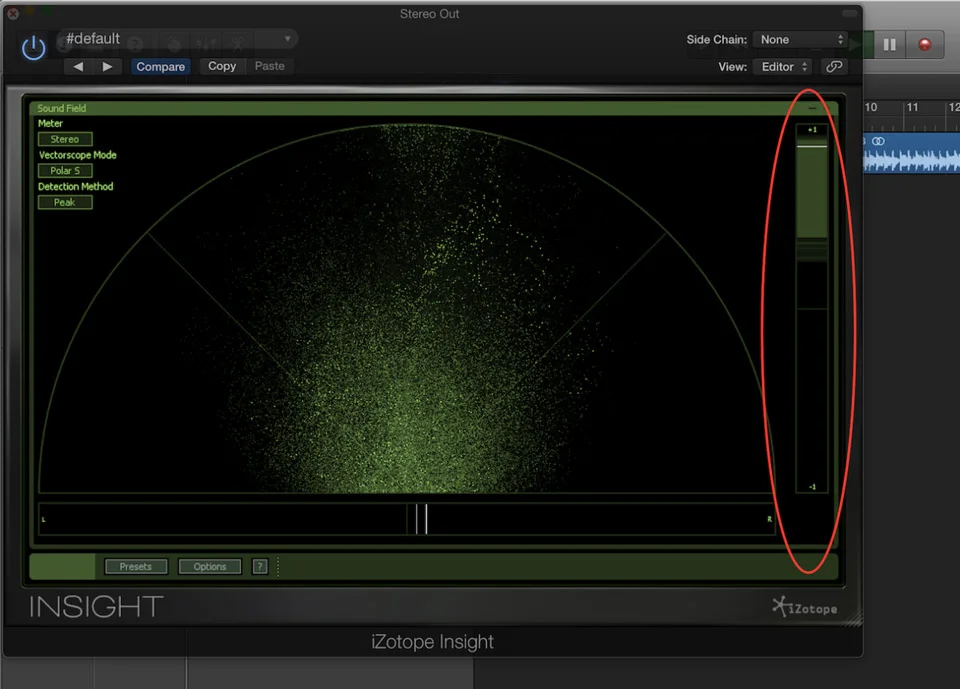
So, you can cue up a reference track, listen whilst checking the value of your correlator, switch back to your mix/master, and repeat. If both the reference and your mix are in the same ballpark, you’re probably doing okay. Even if you’re not—perhaps your tune has a prominent, out-of-phase synth pad that the other lacks—you might still be okay; if your correlator gives you a troubling value in spots, fold the song to mono and listen to see if anything has disappeared from the mix. That’s the meter and your ears working in concert as a checks-and-balance system.
Sidenote: good ol’ fashioned level meters are also handy phase tools, specifically for judging the polarity of your snare and toms against overheads. I’ll never forget watching Tory Amos’s engineer checking drum sounds in just this way: he would solo the snare and the overheads, and watch the meter on the overall output, and then flipped the snare’s polarity. One configuration read inherently louder than the other, and this helped reinforce his decision to leave the snare alone. Then he repeated the steps with each tom; turns out the floor tom sounded better to him out of phase. He might’ve arrived at this conclusion by himself, but a careful eye on the lever meter ensured he got to the right decision for the mix.
What Is Metering Good For?
Now that we have defined what metering is—and what your tools for metering might be—let’s ask ourselves a different question: What is metering good for?
Let's start by addressing what metering is emphatically not good for. I’m doing this to dispel certain fearful notions and put fearful people at ease. See, many engineers recoil from the idea of metering as many musicians tend to recoil from music theory—the idea being that technique can hamper your innate sense of musicality or originality. If that has been your modus operandi in previous situations, I'd like to propose something right off the bat:
Metering Is Not A Substitute For Your Ears
You are being paid for your ears—for the way your ears perceive, balance, and shape music. You’re not being paid to follow the guidelines of a meter and deliver products accordingly, because meters don’t hear music (at least not yet); they read an input signal and spit back information concerning that signal, be it related to frequency, level, polarity, or stereo spread. (Of course, the flipside is if you're mastering for broadcast or podcast—in which case that's exactly what you're getting paid for.)
Meters don’t measure how well a background vocal complements a lead part, whether that vocal should be dipped in level for a certain phrase, or if the vocal feels better on the right or left side of the stereo spectrum. That’s a relational and subjective choice, the actuation of which helps contribute to the goal of music. This is why metering, no matter how complex or newfangled, doesn’t replace the ear: a meter makes value judgements, while your ear makes artistic decisions.
But here’s the thing: you need value judgments to make artistic decisions. A cinematographer needs a light meter to help determine how to shoot the scene. Likewise, an architect needs a graphic scale to draw up plans with accurate dimensions.
Conclusion: Metering Is A Check On Subjectivity
The biggest advantage metering affords is a check on our subjectivity. But first, a question: what’s wrong with subjectivity anyway? After all, we’re being hired for our very subjectivity—that is what defines us, why our clients seek us out. Why would we need to temper this?
For the simple reason that our subjectivity can change drastically from one moment to the next. Anyone who’s mixed a song for more than three hours can attest to what I’m talking about. At a certain moment in the mix—or if you’re like me, moments in the plural—you reach “a dark night of the soul” in which everything begins to devolve; vibrancy becomes stale; second guessing becomes the first order of obsession.
I’ve long said that in these instances, reference tracks are our friends. And true, they are. But proper metering also becomes a safeguard against the negative side of subjectivity here. If we’re familiar with certain targets as they appear on a meter, we can check our work against the accepted averages of our field and continue to plough on through this dark night of the soul into a more glorious morning.
Why not just take a break here, when the going gets rough? Because we may not have the luxury. The client paid us to deliver the mix by morning, and morning is fast approaching; in such a situation all hands must report on deck. We might have lost our objectivity, but a quick look over at the meter when EQing a troublesome passage or establishing the level of multiple songs might get us where we need to go until such a time as we can take a final break for the ear and listen afresh.
This is why we familiarize ourselves with meters, how they work, what they’re for, and the various standards associated with them. It is possible to create a good mix or master without them—but it’s much easier, and saves a lot more time, to just use them.