In this article, sound recordist Keith Morrison will focus on some basic principles that can help deliver organised and high-quality sound on location, enabling all departments to work efficiently. The good news is that expensive kit isn’t necessarily required to achieve this but a good understanding of the production workflow is. Over to you Keith…
Introduction
Capturing dialogue on the set can be challenging. There are limitations and compromises that have to be addressed in a fast-moving environment. The decisions made on-set have an impact on the edit and the audio post-production workflow.
The principles outlined in this article will be in the context of a short film shoot. This is an area where the budget is tight and equipment may be limited. The purpose of this article is not to list expensive equipment, but to show that by adopting some fundamental principles the outcome of your audio recording and workflow can be at a professional standard.
The Challenges
It is, of course, important that the sound department does everything they possibly can to get a clean sound. This includes minimising background noise, laying carpets to reduce footfall and getting wild tracks and alternate takes wherever possible. However, if the sound files that are delivered are badly organised, it makes it a very difficult job for the sound editor to find the relevant files.
The issues that I have experienced when working as a sound editor on short drama productions have included:
No timecode and / or no slate
Files with no relevant names
No metadata
No track names
These are just a few examples of things that can cause a seemingly small job to become a major workload.
Where there has been a shoot with no use of timecode and a slating system (clapperboard), it has created an issue with lining up audio and video. Built-in camera microphones can be very noisy or in some cases, non-existent, which means lining up waveforms cannot be done. This is why a slating system is important regardless.
With no metadata or relevant file naming, searching for alternate takes can be time-consuming. When I started out as a sound recordist I was guilty of some of these. However, even with the most basic of recorder, most of these issues can be resolved.
Pre-production
Before you start filming, read the script. Confirm what you are filming. This will help you understand what equipment you will need in order to do the job correctly.
If your equipment comprises of a two-track handheld recorder and a shotgun microphone, that’s fine, but make sure you know how they work together. Test the input levels and listen for when the microphone peaks. These are things you want to avoid when on-set, so become familiar with the sound of your equipment.
Confirm with the camera department which camera they will be using, if there will be multiple cameras and the frame rate. This is especially important if you are syncing timecode.
If the production is doing the location recces it is worth attending. Recces are good opportunities to listen out for sources of noise. Think about the time of day and how the environment may change, how noises can be minimised or even recorded as wild tracks.
There can be a lot of work to do in order to get the best possible sound on location. This is why sound assistants are important. Assistants are extra hands and ears. Knowing what the demands of the script and location are is important to ensure you not only have the right equipment but also the right crew.
Timecode
Timecode is metadata that corresponds to each frame. Ensuring that the audio recorder and each camera have synchronised timecode, the image and the audio timecode metadata can be matched up in the edit. See the article on timecode for a more in-depth explanation of timecode, the equipment needed and what to do if your recorder or camera doesn’t support timecode.
The Slating System
Ensuring each take is boarded and verbally slated is very important. This process gives each video file visual information including the slate number or scene/shot information as well as the take number. The board being read out and clapped also gives an audio ident and sync point. This is especially essential if timecode is not being used or if an issue arises with the timecode metadata. If a board is not put on the front of the take, make sure an end board is called.
File Management
This is probably the area where a little effort can help the most. First of all, check the format of the tracks you are recording. I would suggest recording at least in 24 bit, 48 kHz WAV file.
Professional recorders will allow you to manage filenames and track labels easily but in lower budget equipment this can be overlooked.
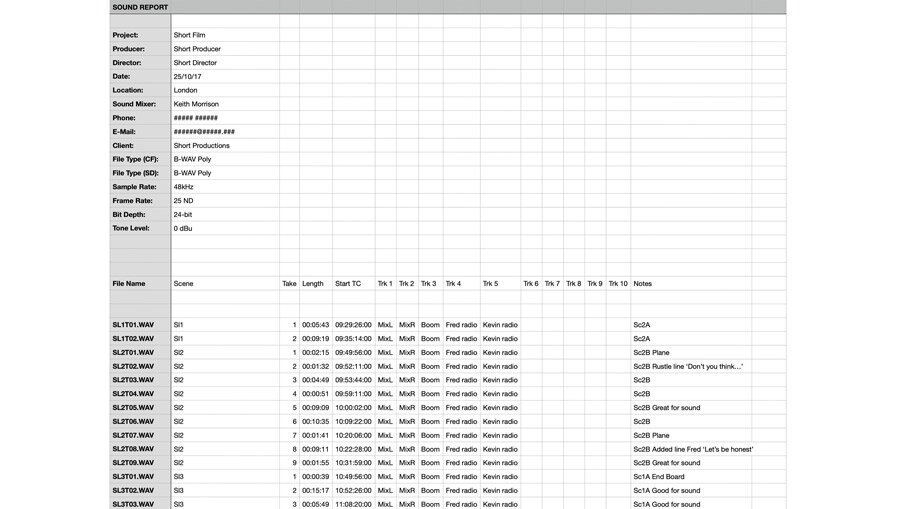
Make sure the system for naming files matches the slating system, so rather than files being called ZOOM_01.wav they are labelled with useful information such as:
Sl01.T01.wav or Sc1A.T01.wav
(slate one, take one or scene one A, take one)
Each day of shooting should have its own folder, but no two files should share the same filename.
If recording multiple sources to the same file (usually a boom and personal mics) make sure each track is labelled correctly for each take. For example, a typical poly-WAV would be labelled like this…
On most professional mixer/recorders, the isolated inputs are recorded to their own tracks (Boom, John Radio, Julie Radio as in the example above are on tracks 3 - 5). These mixers should allow for those isolated tracks to be mixed and recorded to the mix track (MonoMix above). Track names are saved as metadata and can be viewed in post-production.
If the recorder cannot do this, make sure a sound report is written up for each file and given to the editor/post sound editor.
If the recorder allows for notes, be sure to add anything that may be relevant for post-production highlighting good takes, wild lines, production effects or any issues.
Again, if you cannot add digital notes then a sound report should be written up and passed on.
Back Up
Backing up the sound files is very important. If your recorder doesn’t support dual recording, try and make a back up at lunch or definitely before you leave. Preferably, hand over the daily rushes to the relevant person in the production - from experience this is very important!
Following a day shooting with a production company from Canada in London, my sound equipment was stolen from the boot of my car. I had a Sound Devices 633 mixer/recorder with both the SD and CF cards still in the machine, and I hadn’t transferred the files to a separate drive. Luckily I had handed off the sound files to the production before my sound recorder was stolen. Equipment can be replaced but the day’s work cannot.
Conclusion
There are many things a sound department are challenged with on the set and throughout the post-production process. By adopting these organisational tips, some of the time-consuming pitfalls can be avoided and the hard-earned audio can be utilised as intended.