

Post production sessions can be complex. A large number of different reverb settings are typically required across the duration of a TV show or film in order to accurately represent the acoustic settings depicted on screen. One way of accommodating this is to have a separate reverb plugin on its own aux track for each and every different acoustic location. This means running multiple instances of reverb plugins and automating sends from dialogue, foley and sound effects tracks to use the reverb appropriate to that particular part of the project.
An alternative to this is using just one or two reverb plugins in your session and automating the recall of settings within the plugin itself, scene by scene. This saves on CPU resources and provides a way to ‘lock in’ plugin settings to reduce the chance of them from being changed inadvertently later on. In this article we’ll look at the process of doing this using Cinematic Rooms from LiquidSonics.
Enabling Cinematic Rooms For Automation
There are very good reasons why Cinematic Rooms has become my go-to reverb for audio post. It supports channel widths from mono up to 9.1.6, provides great presets along with extensive controls which can be tailored as required, but even more importantly, it sounds great!
For this example I’m going to keep things simple and use it purely as a dialogue reverb but in practice I use it for anything where I need to simulate the sound of a room. The presets include a wide array of small to large rooms and spaces, with preset categories encompassing Ambiences Chambers, Halls, Non Linear, Post, Rooms, Spaces and Studios.
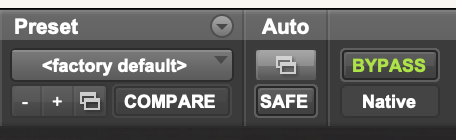
Using a send in the usual way, and with Cinematic Rooms instantiated on an aux track, auto-enable everything in the plugin. One way to do this, and perhaps the quickest, is to hold down Control, Option and Command and click on the plugin automation enable button. That’s the one just to the left of the Bypass button.
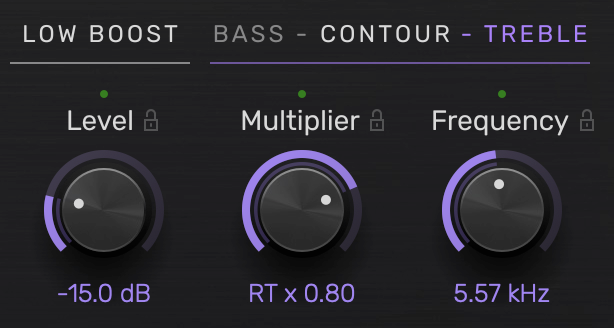
Once enabled, all parameters within the plugin display a small green light to indicate that they are automatable.
Setting And Writing Parameters For The First Scene
Now we can start listening through presets for the first scene. With some level being sent from the dialogue track(s), cycle through presets in Cinematic Rooms and tweak manually as required.
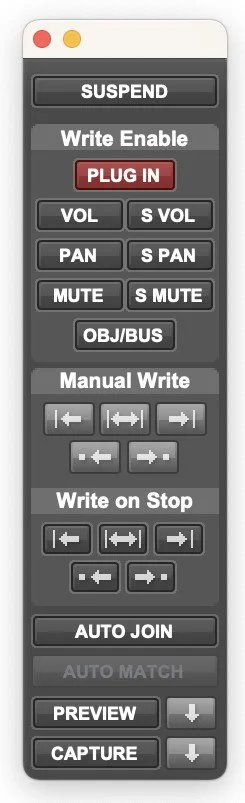
Once you’ve established the settings you’re happy with for that scene, you’ll need to anchor these settings in for the duration of it. Make sure that ‘Plugin’ is highlighted in red in the Pro Tools Automation window.
Once that’s active, make an edit selection within the reverb aux track which covers the entire length of the scene and then use the Write to All Enabled feature from the Edit menu in Pro Tools (or use the shortcut Option Command /). Pro Tools will write breakpoints for each and every parameters in Cinematic Rooms at the start and end of the selection, thereby writing static automation across its duration.
This now means that, as we change settings for subsequent scenes and write them in a similar way, Pro Tools will always recall the settings for each scene as we play the session or skip around the timeline.
Now we need to go through a similar process for other scenes.
Writing Automation For Subsequent Scenes
With the static reverb automation written for one scene, progress onto another one. In order to freely audition settings within Cinematic Rooms, you’ll now need to disable automation for that track. Set the reverb aux track’s automation mode selector to Off. Now you can cycle through presets and settings until you find something which works for the current scene in your session.
Once settings are established, write them in using the same method as before by making a selection across the scene duration and using the Write to All Enabled feature again. Be sure to switch the track back into Read mode afterwards. Now, when you jump between scenes, the settings within Cinematic Rooms will change as needed to the ones you chose for that scene.
To see this whole process in action, take a look at the video below.
Final Thoughts
Using the methods described above, you can reduce the number of instances of reverb plugins used in your session. I wouldn’t suggest using automation on any reverb to switch settings while audio is running through it due to the potential for glitches as it switches parameters. For this reason, it’s best to run a couple of instances and alternate between them throughout the project.
Cinematic Rooms provides some of the most natural sounding reverbs for rooms and spaces. It includes advanced features such as Surround Editing Planes, which allows you to apply different decay times to the front, rear or side channels, and Crossed Control which works as a form of pan tracking, allowing you to set the level, delay and rolloff so that the reverb in channels further away from the panned sound changes with distance from the source. It’s an incredible plugin and, along with the ability to automate all parameters if required, provides a very powerful set of tools for crafting and tailoring reverbs precisely to your needs.
