

Clip Gain and volume automation are both methods by which the volume of audio on your timeline can be adjusted. On the face of it, they may seem quite similar. Both allow you to affect the level at which elements of your mix playback but there are actually several major differences in how they operate and, consequently, how you use them. In this article we’ll cover these differences and consider some use cases for each.
Similarities
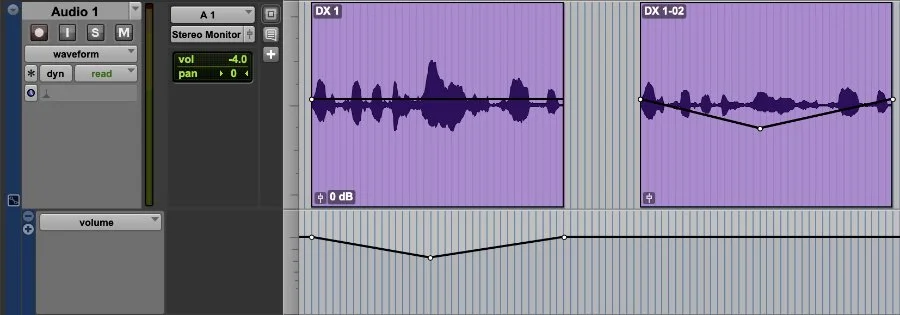
Let’s start by looking at the similarities between Clip Gain and volume automation. There actually aren’t that many. Both can be used to affect the playback level of content on tracks. Each can be adjusted with the Grabber, Trim and Pencil tools. Both Clip Gain and volume automation can be either static (ie not changing across the duration of a clip) or dynamic (varying over time with the use of breakpoints). Clip Gain and volume automation can be copied, pasted and nudged. In the image below, two instances of the same clip have been equally affected in level, the first with volume automation, and the second with Clip Gain. In the absence of any plug-in inserts on the track, both of these would sound identical on playback. The only obvious differences at this stage are that the second clip now has ‘-02’ in its name and the waveform has been visibly affected to reflect the Clip Gain adjustment.
This is just about where the similarities end. Let’s consider the differences between Clip Gain and volume automation and how this impacts on how you should use them.
Differences
There are plenty of differences between Clip Gain and volume automation and how they operate. We’ll delve into some ways to use both shortly, but for quick reference, here’s a list.
Clip Gain is pre-insert. Volume is post-insert.
Clip Gain provides adjustments from -144dB up to +36dB. Volume automation provides adjustments from -144dB up to +12dB.
Clip Gain is clip based and is always associated with a clip when it’s copied, pasted or moved. Volume automation is track based and can be independent of clips when moving them with the ‘Automation Follows Edit’ button at the top of the edit window de-selected.
There’s only one volume automation playlist per track and it persists when playlists are changed. The clip based nature of Clip Gain means that different Gain settings can be applied to clips on different playlists if required. Clip name suffix numbers are incremented whenever an adjustment is made with Clip Gain and a new subclip with those settings applied is added to the clip list. This can subsequently be dragged out with the Clip Gain intact.
Clip Gain adjustments made with the pencil tool are bound by the edit selection, unlike volume automation which is not constrained by edit selections.
Volume automation can be written and modified in real time with a fader. Clip Gain has to be created and modified using the edit tools.
Now let’s look in more detail at the most important of these differences.
Pre Vs Post Insert Processing
Perhaps the most notable difference between Clip Gain and volume automation is that Clip Gain is pre-insert whereas volume automation is post insert. This is of critical importance because Clip Gain occurs prior to any plug-ins you may have on the track. The most obvious category of plug-ins which this will affect is dynamics. Turning something up or down with Clip Gain means that you’re affecting what actually goes into a compressor or limiter. Adjusting something with volume automation will adjust the signal level once it has already been through the plug-in. To give an example of how this might be useful, let’s say you’re mixing a documentary and there are several interview clips on a dialogue track, all of which have been recorded at slightly different levels. If you were to put a compressor on one of the inserts without adjusting Clip Gain, the clips which were recorded louder would trigger the compressor more than the ones which were recorded quieter. Even if you subsequently made adjustments with volume automation, the clips which were louder to begin with would still be more compressed than the ones recorded at lower levels.
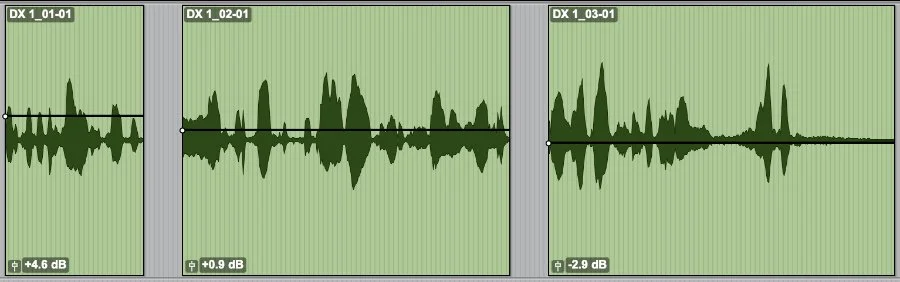
In the image below, three dialogue clips exist on a track. No Clip Gain has been applied and the third clip is a lot louder than the first. This would inevitably mean that clip 3 hits the compressor harder than the first.

In the second image, Clip Gain has been adjusted to give a similar perceived level between the clips. Because this is pre-insert, the compression will now be much more consistent between them and we avoid over compressing the clip which had the higher initial level.
It makes sense to use Clip Gain as a preparatory levelling stage prior to mixing. In the case of dialogue, volume automation can subsequently be applied in order to balance the dialogue against other elements of the mix such as music and effects.
Turning Loud Music Down With Clip Gain
Take a look at a fader and you’ll see that the dB markings on it are not linear, they’re logarithmic. A small amount of fader movement close to unity gain will correspond to a fraction of a dB change in level. Closer to the bottom of the fader, the same amount of movement will equate to several decibels of level change. When working on podcasts or documentaries where music which was mastered to a high level is to be combined with dialogue, the fader on the music track will inevitably need to be brought down quite far in order to balance it correctly with the dialogue. This can be a problem because it’s tricky to make accurate adjustments to faders when you’re in the lower part of the fader. In such cases, turning down the overall music level with Clip Gain means that you’ll be working with higher fader positions where any given amount of fader travel means a smaller change in level, giving you better control.
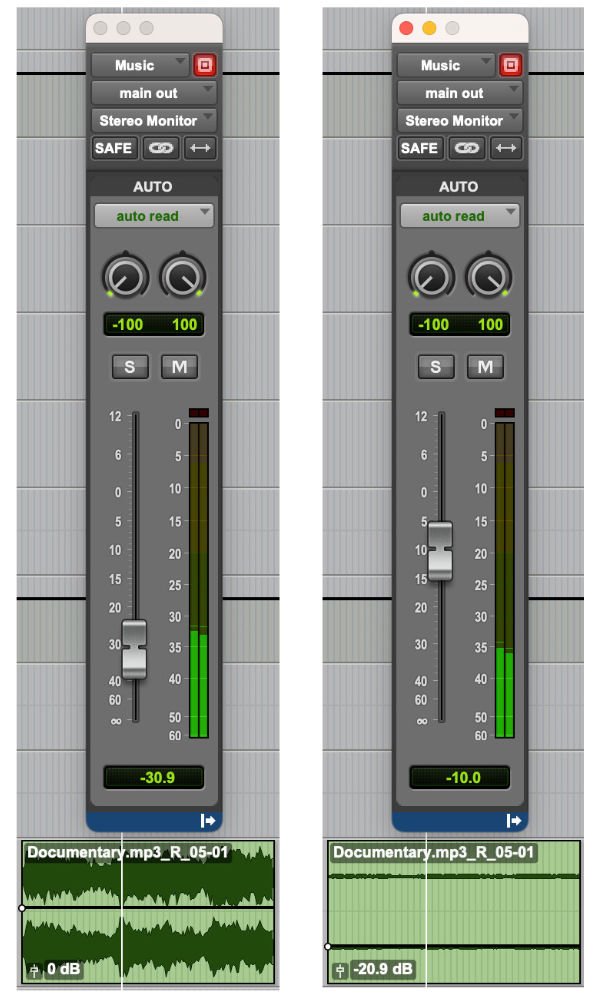
In the left hand image the music has been mastered to a very high level and the volume fader has to be brought down a lot in order to balance it with the dialogue.
In the right hand image, the music has been brought down with Clip Gain, meaning that we can use a higher fader position. Now, when automating the volume, more control is afforded due to the non-linear nature of the fader. One small potential downside to this is that the audio waveform is now tiny and it’s hard to see detail. All waveforms on the track could, however, be zoomed by selecting the Zoomer tool and holding down the Control key (Mac) or Start key (Windows) while dragging up or down with the mouse over the waveform.
Combined Clip Gain And Volume Automation Usage Example
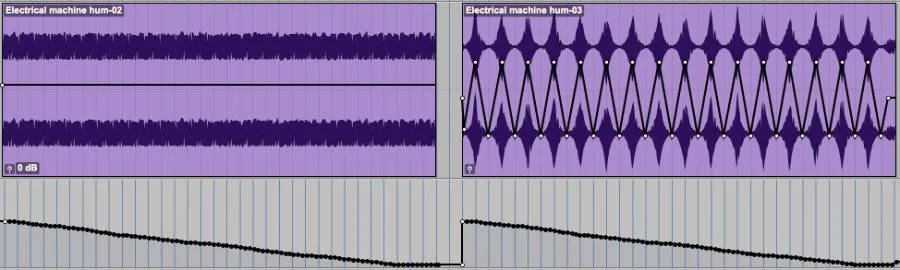
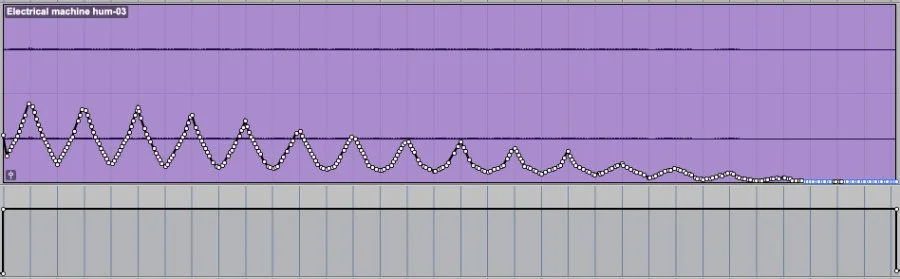
There are an infinite number of potential uses for Clip Gain but we’ll look at a specific one which I encountered recently. The left hand waveform in the image below shows a continuous electrical hum sound. I needed this to gradually fade out over its duration. This was easy enough to do with volume automation, but I also needed it to pulse up and down in level whilst continually fading. This would be very tricky to do with just Clip Gain or volume automation alone and so, as you can see in the right hand waveform, I applied the level pulsing effect by dynamically adjusting the Clip Gain. This, coupled with the volume automation, achieved the desired effect.

It’s worth noting that once dynamic Clip Gain has been applied, the ‘Clip Gain Info’ display at the bottom left of the clip won’t show an absolute value. This is due to the fact that the level changes over time and so there is no fixed value for the whole clip. Clicking on the mini fader icon to make an adjustment will show a dB value with the Delta symbol next to it. This Delta value denotes an amount of change and allows you to turn dynamic clip gain up or down as a whole.
Converting Between Clip Gain And Volume Automation
There will be times when you wish to convert volume automation to Clip Gain or vice versa. Fortunately, this is easy to do. With the clip(s) you wish to affect selected, go to the Pro Tools Edit menu and under the Automation section choose the relevant option.
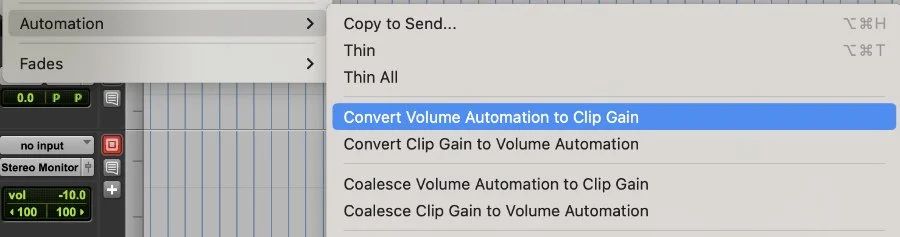
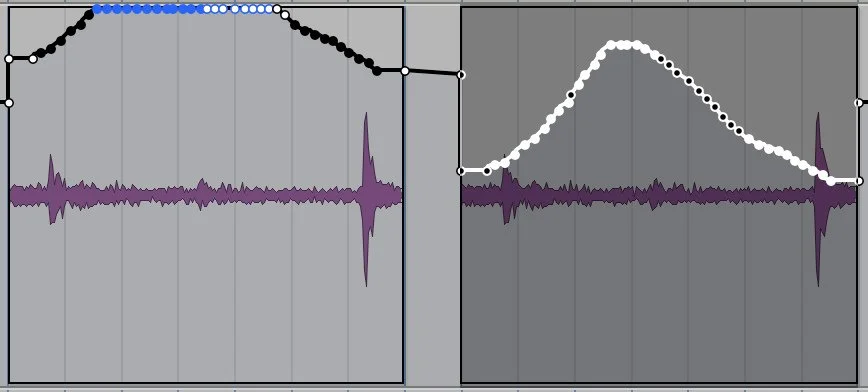
One thing to be aware of here, aside from the obvious pre/post fader consideration is the +12dB limitation of volume automation vs Clip Gain’s +36dB. Any Clip Gain values above +12dB will be limited to +12dB when converted to volume automation. However, Pro Tools does retain a record of the previous relative levels and so, if you subsequently wish to restore the contour of the automation, albeit at a lower level, you can still trim it all down with the Trim tool. The image below shows volume breakpoints which have been converted from Clip Gain. In the left hand clip, blue breakpoints denote levels which previously exceeded +12dB. In the right hand clip, the volume automation has subsequently been trimmed down, restoring the relative balance originally found in the Clip Gain.
It should be noted that you also have the option to render Clip Gain. This effectively creates a new clip with the effect of the Clip Gain baked into the audio and a new, flat Clip Gain line. Rendering Clip Gain can be done either by right clicking on the Clip Gain Info icon within the clip and choosing Render or by selecting the same thing from the Clip Gain section of the Clip menu.
If you wish to combine Clip Gain and volume automation together, you can choose to coalesce them. This, again, is found under the Automation section of the Edit menu. One case in which this could be useful is the example we looked at earlier of the pulsing but continually fading humming sound. Here’s how it would look when coalesced to Clip Gain. This then gives us a flat volume line to apply additional automation to should we wish to do so.

Automating And Trimming Volume
One of the big features of automation in Pro Tools is that it’s quite extensive in the options we’re given for actually writing and tweaking it. This goes for all types of automation including plug-in, volume, send volume, pan, send pan, mute and send mute. With volume automation we have plenty of options for how we go about applying it. This includes using the mouse along with a number of the Pro Tools edit tools to make and adjust breakpoints and also real time automation with a control surface or the virtual faders in Pro Tools. Volume automation is easy (with a little practice) to write in real time and it can be tweaked on subsequent passes with automation Trim mode. Pro Tools automation is so in depth that it warrants its own article. Julian covered it in his article Pro Tools Automation - Everything You Need To Know.
Final Thoughts
The combination of the feature sets of Clip Gain and volume automation provide us with some powerful tools for levelling out and mixing audio in Pro Tools. Clip Gain should be thought of as a means of gain staging the audio prior to the actual mix. It can be used as a preparatory stage and also for some creative purposes as mentioned in the example earlier. Also, for selective adjustment of overly dynamic instrument or vocal parts, Clip Gain is a great way of smoothing out the differences while leaving the volume fader free to actually balance the various elements of the mix against one another, changing dynamically wherever required through use of automation.
