
In this, the second of a short series of tips articles, we present five useful Pro Tools tips. Handy, easily digestible features. Hopefully among them there is something here which will be new to nearly everyone.
In this video, brought to you with the support of Avid, Julian demonstrates these five tips, for a text description read on as they are detailed below.
Cascade Inputs/Outputs
You probably already know that to set the input or output of a track or send you click and select from the drop down menu. To set multiple tracks to the same input or output in one operation, select the tracks and hold Opt+Shift, or Alt+Shift on a PC. And to set for all tracks just use Option/Alt. However did you know that by holding Command+Option (Control+Alt on PC) you can cascade all track inputs or outputs upwards? So for example in a session with 8 mono tracks, using Alt+Command you can set the inputs to these tracks to 1 to 8 across those tracks in a single operation? Possibly even more useful is the addition of Shift to this command which allows you to cascade inputs or outputs to selected tracks only. This is a real time saver when setting up sessions!
Jumbo Meters
The metering in Pro Tools is more flexible than it is in some other DAWs. If you right-click on a meter in Pro Tools you’ll find a choice of metering types and if you go to the Metering tab in the Preferences you’ll find you can customise many aspects of the meters’ appearance and functionality. However you won’t find the option to change the meters’ width. If you hold Command, Option and Control and click on a meter they will fatten out to about double their size. I’ve never felt this to be necessary in the Mix window but it also affects the meters in the track header in the Edit window, I find it useful there. Interestingly it doesn’t affect floating fader windows.
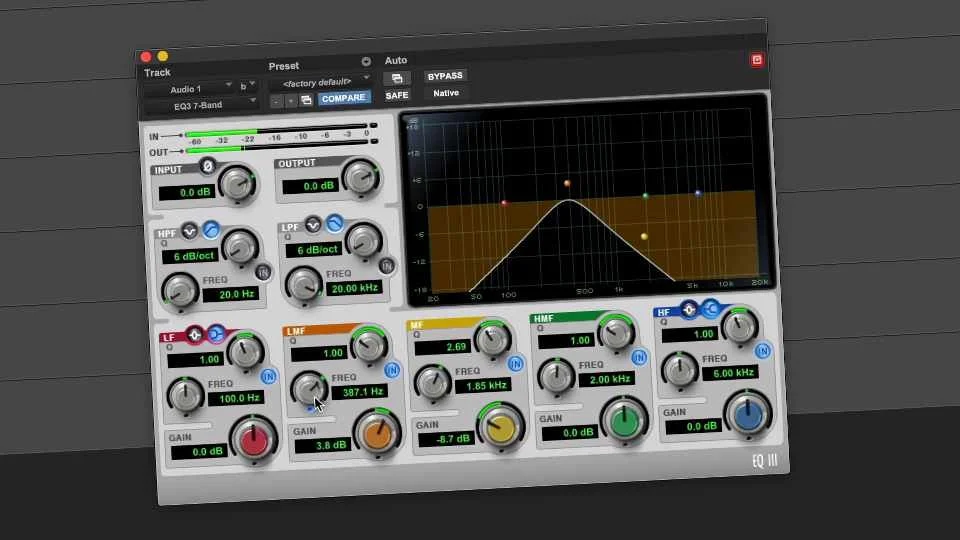
Band Pass EQ Mode
The time-honoured way of tracking down frequencies when EQing by sweeping a narrow boost up and down is something I’ve always found counterproductive. A big narrow boost of any frequency sounds bad and I just find everything sounds horrible, and my perspective on the sound is affected. A far better solution is use of a temporary band pass feature. In EQs which provide it, this feature allows you to solo a band of EQ and audition its frequency and Q without introducing a boost in gain. Because this feature is momentary as opposed to latching it is much easier to drop in and out of, allowing you to focus in on the sound you’re chasing without killing your perspective.
In Avid EQ III hold Control and Shift (Start and Shift on PC) and use the control point or the frequency knob to find your target. You can change the Q in Band Pass mode but the gain is inactive. Helpfully these modifiers have the same effect in Avid Channel Strip’s EQ. If you’re a user of Fabfilter’s Pro Q3 then the same functionality is available by clicking the Solo button, which looks like a pair of headphones, in the filter’s control panel.
If you’re still boosting to find frequencies and haven’t tried band pass mode give it a go.
Use Shift To Open Multiple Plugin Windows
The behaviour of floating windows in Pro Tools, things like the Transport, Memory Locations and the Big Counter is predictable enough. A great shortcut I use all the time is Command+Option+Control+W (Control+Alt+Start+W on a PC). This closes all floating windows. And if you use it a second time it will bring them all back again - very handy! However Plugin windows and floating fader windows work slightly differently as they all have the square red Target button.
This Target button is used to direct an action at a particular window when there are multiple windows open. If you open a plugin window it will open but it you click on a second plugin it will be replaced by that second plugin’s window. This is a great way to automatically keep window clutter down. However if you want to view more than one plugin (or floating fader) window at a time them you have to untarget the first window before opening the second. A much faster way to achieve the same thing it to Shift+click on your plugin windows to open them without losing the previous window.
Create 1K Tone Clips
You might already know the keystroke for Consolidate Selection is Option+Shift+3. Consolidate creates a new Whole File Clip on the timeline from an Edit Selection. It’s useful for rendering edits as, unlike using a Clip Group, it creates a new file on disc which can be used elsewhere. However you might not know that if you add Control (Start on a PC) to this keystroke you can create a clip containing a 1KHz sine tone at -20dB. I find this really useful for quickly creating test signals when troubleshooting, it’s faster than instantiating a Signal Generator plugin. It’s not possible to customise the tone which gets created, which is a pity. I’d sometime like to be able to create something else, particularly if I’m going to hear it, 1KHz is no fun to listen to. If you need to bleep out profanity then selecting over the offending words and hitting this keystroke will do the job, though I favour Command+M to mute profanity, bleeps just draw attention to it.
So there are our second instalment of five things to know in Pro Tools. I hope there was something new here for you, check out the first five tips here.
