

Part 5: Mixing in Atmos
I was recently asked to record two pieces of piano music played by my friend Jason Hardink (pianist with the Utah Symphony). In this article—the last of 5—I’m going to describe the process of making a mix in the Dolby Atmos format. This is a format that scales from stereo up to immersive (surround and height), depending on the playback system of the listener. Unlike the stereo mixes, I can’t provide the Atmos mix at the present time. Youtube doesn’t support the format. Atmos is supported on a number of commercial streaming services, but we haven’t released on any of those services. I hope that those of you with an interest in the format will still find this to be a useful read.
Making an Atmos mix of classical music is great fun, with some necessary restraint. Some music is made to be manipulated: this could include most forms of popular music, film music or even some advanced electronic music. But most classical music is made to be heard in a recital space or concert hall. Flying a piano around the room is tempting, but generally not appropriate. Our interest in mixing this music in Atmos is to give it a firmer sense of place in a way that puts the listener in a convincing hall. In this mix, I opted to place the listener at the piano keyboard (or perhaps a step or two back). I felt it was the best way to hear the music.
My mixing space is a pretty typical minimum room for doing Atmos. There’s a speaker directly in front (the center speaker), another pair in the traditional stereo location (L/R), another pair on either side of me (sides), and a pair in the back corners of the space (rears). I also have a subwoofer to give me accurate low frequency discernment. So far, this is a standard 7.1 setup. I also have 4 speakers above me—one pair ahead and another behind. So the whole arrangement is called 7.1.4. There are rooms with a few more speakers and some with many more. I wouldn’t mind a few more myself, but I haven’t yet found a tree that grows dollars.
I’m going to avoid a full description of Atmos here. if you’ve read this far, you’ve already got a decent idea of what it is. But one of the real merits of the format is that it scales pretty well to what you have—whether it’s earbuds, a typical A/V surround system, a soundbar or a full-blown multi-speaker room. With all that out of the way, let’s take a look at how the mix was laid out:
We’re in Pro Tools, which is connected to the Dolby Atmos Renderer. The recorded audio is at the left, in dark blue. These four stereo channels are the original 8 microphone channels. I’ve finally downsampled them to 48K, which is the only sample rate currently supported by Atmos. These channels are not routed directly to output. Instead they are sent to aux busses.
Panning of the original signal
The aux busses go to five channel strips (5-9 in purple). These strips are Atmos objects. From left to right, you’ll first see the strip that receives the M/S signal. In this strip, you’ll see M/S decode, along with some EQ, a bit of light compression and a limiter. This is an odd place for a limiter, but we’ll talk more about mastering a little later on. This decoded signal is cross-panned (as it was in stereo) and toed-in just a little. The objects are widened as well.
The next channel strip (#6) receives only the mid signal from the M/S pair. This object is routed to the center channel. This gives a much firmer anchor than a phantom center, and the image will hold up much better as you move around the room. The rest of the processing on this channel is largely the same as the first strip, with a few small differences in EQ.
Moving to channel strip #7, we have the signal from the A/B pair of flanking omnis. These are panned to the side speakers and the signal is widened a little. This gives a great sense of spaciousness without being obtrusive. I added a very small bit of delay (3-4 milliseconds) to make sure that the Haas effect didn’t cause the listener to hear signal originating at the sides.
Channel strip #8 has the output from the Decca experimental pair, widened as in the stereo mix. These mics are panned midway between L/R and sides. In a larger Atmos room, this signal will actually be assigned to the “wide” pair of speakers. Either way, the placement provides a nice unobtrusive bridge between the M/S signal and the side signal.
Strip #9 contains the signal from my high room mics and is panned to the top speakers, midway between front and back. This would normally go to the bed, but I’ve done a few things that I’ll talk about later on.
Panning into the reverb
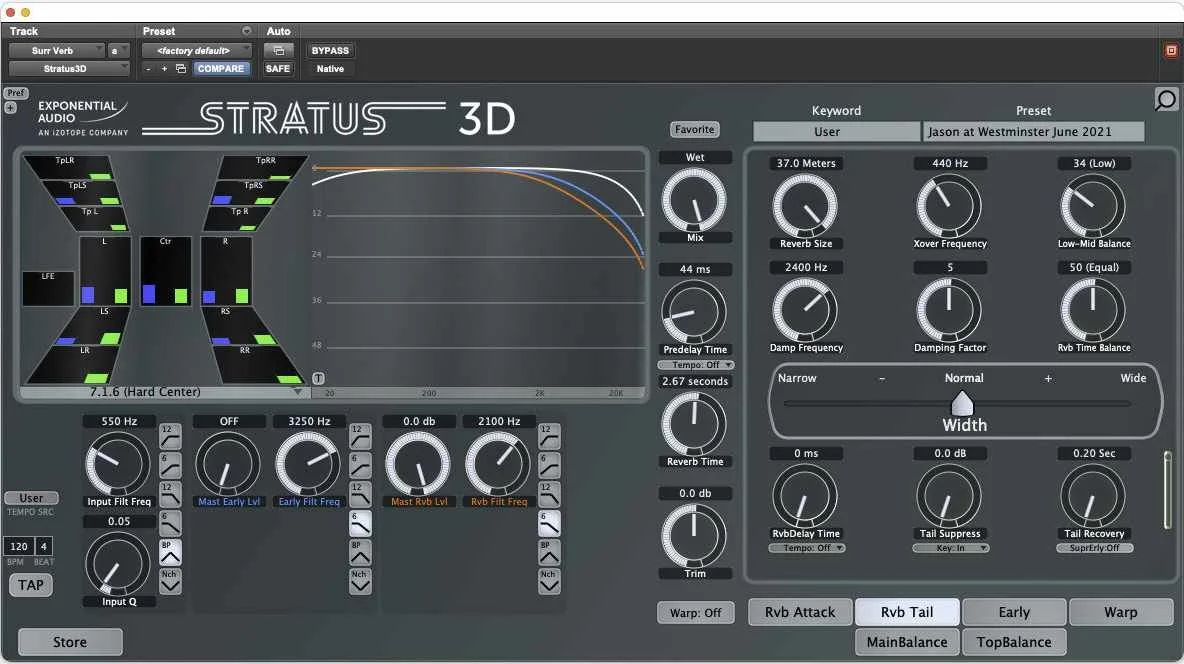
You can see the way the reverb reacts. Inputs are in blue and outputs in green.
You should notice that each of channel strips 5-9 is also attached to a reverb send. This send is the maximum width supported in Pro Tools, which is 7.1.2. The panning into the send follows the same path as the object routing. For example, a signal panned to front center enters the reverb at front center. A signal panned to left side enters the reverb at left side. A properly-written reverberator will react in a natural manner to this placement.
Signal coming out of the reverb
The reverb signal is sent not to the Amos bed, but to a 7.1.2 bus. The top corner channels are picked up in channel strips 11 and 12. Only the low reverb channels (7.1) are sent to the bed. The high channels are sent to objects which are panned as shown in the image of the mix window above. You’ll also notice that the top center reverb (or top side as I should have labeled it) is also ducked by about 10dB relative to the other height reverbs. In part this is because the room omnis are panned to the same location. But there’s more to it. That requires a whole new paragraph:
The Atmos bed is problematic in the height channels, since there are only two high channels in the bed. While a very minimal Atmos playback system may only have two height speakers, most will have more. If you have only a single stereo height signal in your reverb, it will be smeared across all of the height speakers. This actually results in a reverb that is less spacious. So let’s say you have 4 height channels in your reverb. If you have 4 height speakers, the entire room will open up and the sense of reverb will be much more spacious. But if you add the high bed channel, that spaciousness will degrade, since the bed is mixed into all of the height channels. By ducking that channel by several dB, this deleterious effect is much reduced. But we don’t want to through the baby out with the bathwater. What if the playback system has 6 height speakers? If we’ve taken that bed pair and placed them into an object panned midway between high front and back, you’ll get 6 discrete reverb signals, which will sound really great. This folds down acceptably to 4 and 2 height speakers. This means that the height reverb should always go into objects. Forget there’s a bed up there.
Minimize use of the bed
The Atmos bed is more or less a crutch for those coming out of the stereo and surround worlds. Unlike objects, the signal is time-aligned, just as it has been in theaters for the last 30 years or so. But the bed can’t take advantage of a system with more speakers and it greatly lowers the positioning accuracy of your mix. That doesn’t mean objects are problem-free. Objects are not time-aligned based on their position in a mix, so you must have a general notion of the room the mix will play back in. I suppose it makes me a teensy bit sad, but I think there’s not likely to be a theatrical release of the mixes I’ve described in this set of articles. This means that, whenever necessary, I introduce alignment delays that will work in smaller rooms. A film mixer has to worry both about large theaters and intimate living rooms. My hat is off to those mixers—they are real pros.
Now back to this mix…
Taking a last look at the mix window (I’ll give you a minute to scroll back up to the top of the page), you’ll see three more channel strips. Strip #14 is simply the low part of the reverb going straight to the bed. Strip #15 is a VCA which allows me to control the level of all signals on the way to the Atmos renderer. There’s no such thing as a master strip for Atmos, so a VCA (or nested set of VCAs) is the cleanest way to manage overall level. And finally strip #16 is linear timecode going to the renderer to keep it in sync.
A peek at the Atmos renderer
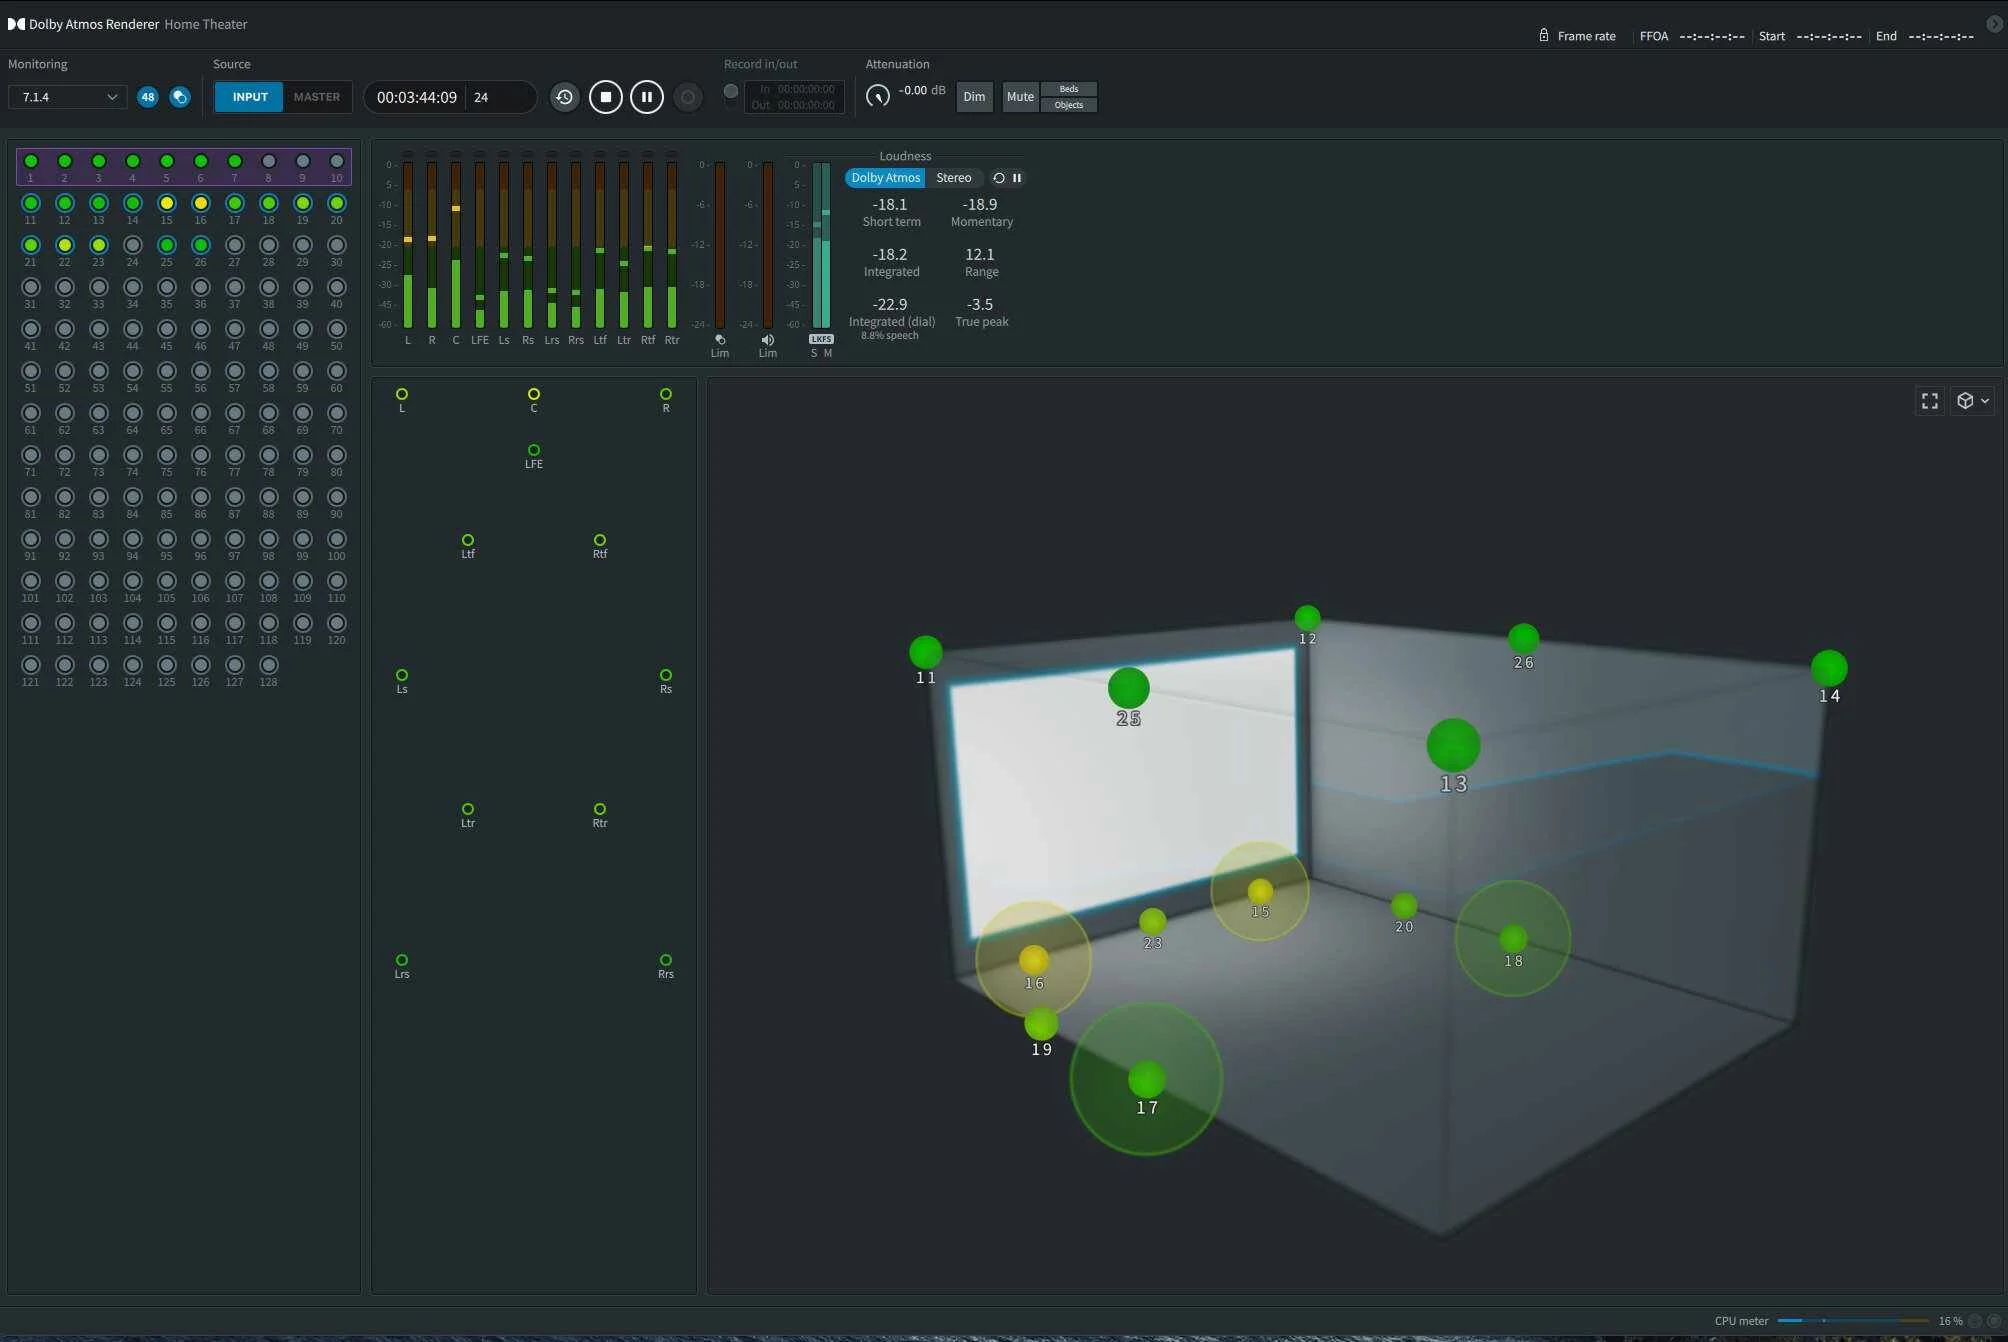
Here’s an overview window of the renderer.
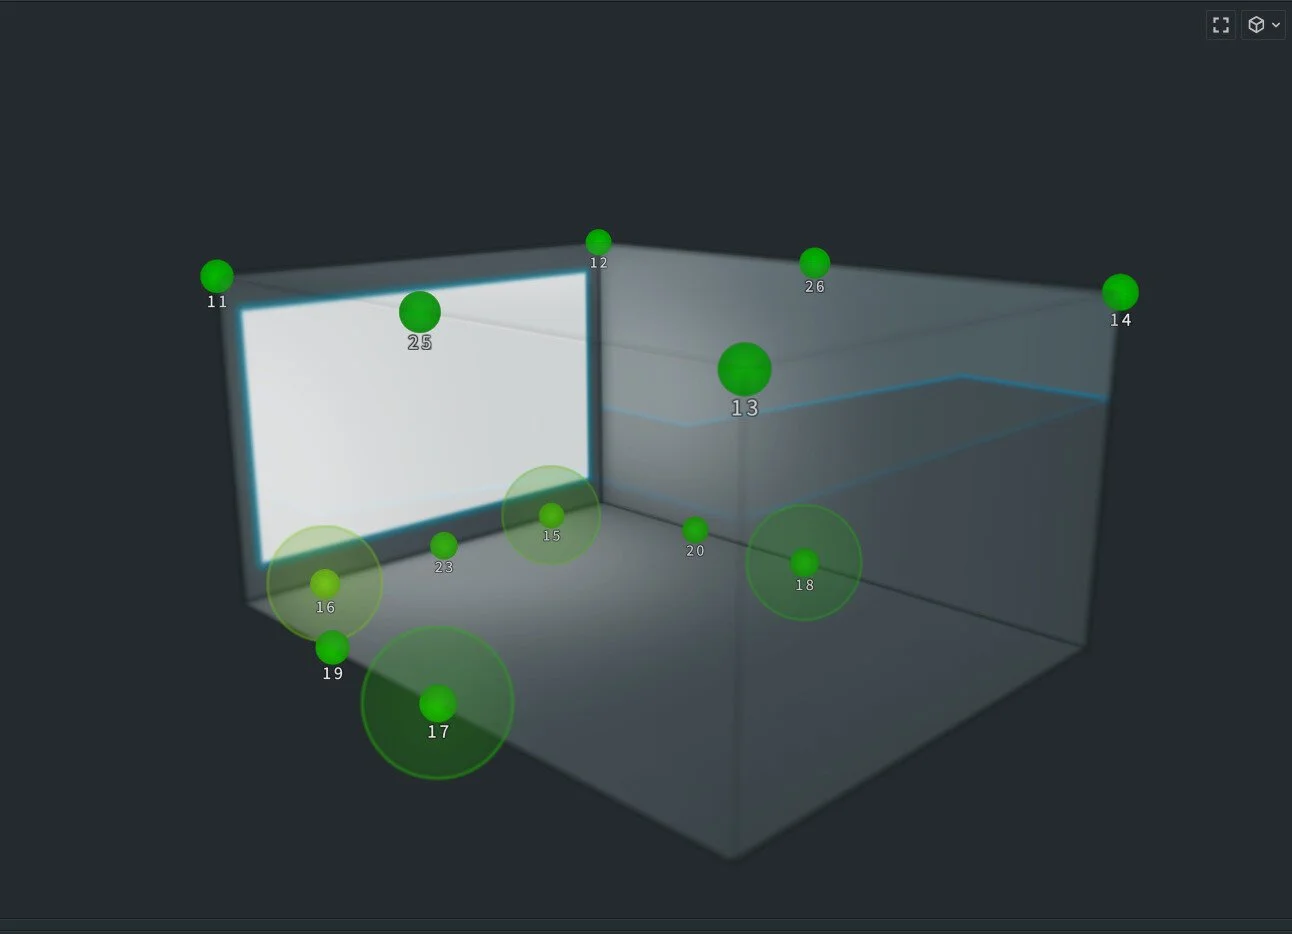
Here’s a more detailed view of the positioning part of the mix. You can see the objects, their positions, their sizes and their intensities. Signals in the bed are not shown here.
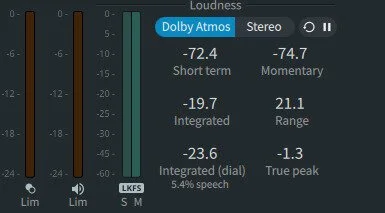
The loudness metering is very important. In Atmos music, the integrated loudness should normally be no higher than -18LKFS. I’m at -19.7, which is right about where this piece needs to be. The true peak should be no higher than -1dB. I’m at -1.3 and I won’t argue with that!
Mastering in Atmos
Mastering is—to me at least—the hardest part of Atmos. The creative part is fun, but when you’re delivering a mix, you really have to be very close to the specified loudness measurements. There are not really any mix-wide tools to help. There’s no 128-channel compressor, limiter, EQ—anything really. Mono/stereo versions of those tools are still very helpful. I used them here in this quite simple mix. But there’s a lot of non-intuitive stuff going on in Atmos. An adjustment of the VCA won’t necessarily give you a linear change in the overall loudness. That really depends on where the energy is in a particular piece. Experience in a given genre makes a big difference. But until you’ve gained that hard-won experience, you can count on putting in lots and lots and lots (and lots) of hours.
Summary
I hope you’ve enjoyed this seres. I have to confess that it ended up taking a lot more time and required a lot more words than I envisioned when I decided to share my experience. For me, it’s back to composition for a while. If your a classical recordist—even a beginning one—I hope there’s something for you in the first four segments. If you’ve been around the block a while longer, I hope you’ll enjoy moving a project into Atmos.
